More options for Autopilot Naming Convention
The purpose of this blog post is to inform you how to configure your Autopilot naming convention with options other than the built-in options based on the Autopilot Tag
On August 2nd, I published a blog about the missing naming convention option to increment your Autopilot devices. By default, Autopilot can only use the variables %SERIAL% and %RAND:x%. Via an Azure Logic app and SharePoint List, I created an option to increment your device names. Like LPT-1, LPT-2, etc. One of the questions I got via LinkedIn was whether it is also possible to configure, for example, LT001NL or DT015BE. So, I decided to figure it out and it is possible. For this blog, I decided to use the Autopilot Group tag.
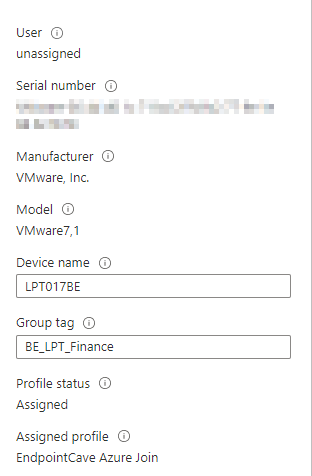
In this blog post, I have used the following Group tag: {Entity Code}_{Acronym of device type}_{Department}. If you are going to assign the naming convention of your Autopilot devices this way, it is super important that the Group tags are always configured the same way.
For example,
BE_LPT_Finance
NL_DT_Reception
DE_LPT_Finance
DK_DT_Marketing
Requirements:
License Requirements:
Graph API Requirements:
What is Microsoft AutoPilot?
Windows Autopilot is a collection of technologies used to set up and pre-configure new devices or devices that have been reinstalled or reset and get ready for productive use. Autopilot automates, changes, and adds screens in the OOBE phase and together with Microsoft Intune, you can give your devices directly to your end-users without the need to do manual tasks, build, maintain, or apply custom operating system images.
More information can be found here
What is an Autopilot GroupTag
A group tag is a string attribute that can be used to identify a group of devices. Intune’s group tag field maps to the OrderID attribute on Azure AD devices. So, Microsoft provides the ability to add group tag to each Autopilot device to support automation. For example, automatically add those devices to groups based on their Group tag and assign automatically add Autopilot Profiles. But this can also be used for other purposes like my solution for naming convention.
What is Microsoft List?
Microsoft Lists is a Microsoft 365 application that allows you to create simple, intelligent, and flexible lists to help you to organize your work more effectively. Microsoft List is stored on a SharePoint Site and can also be included in Microsoft Teams. Microsoft List can also be used as a data source for automation. With ready-made templates, it is an easy and handy tool to use.
More information can be found here
What is an Azure Logic App?
Azure Logic Apps is a cloud service that helps you schedule, automate, and orchestrate tasks, business processes, and workflows when you need to integrate apps, data, systems, and services across enterprises or organizations.
More information about Azure Logic Apps can be found here
How to configure the other naming convention options
Part 1 – Create App Registration
- Open Portal.azure.com
- Click on Azure Active Directory
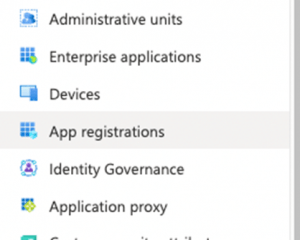
- Click on App Registration in the left menu
Or use the following link Active Directory | App Registration
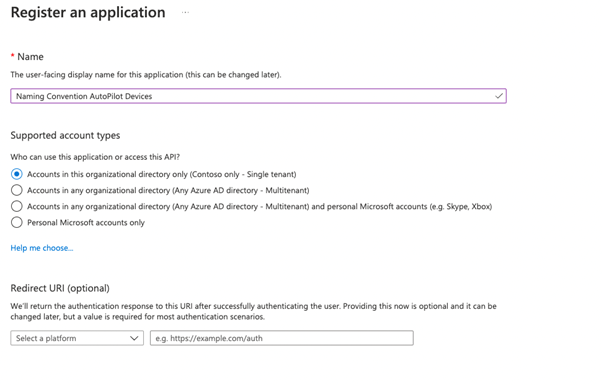
- Click on + New registration
- Configure an app name e.g., Naming Convention AutoPilot Devices
- Click on the Register button, the app will be created and automatically opened.
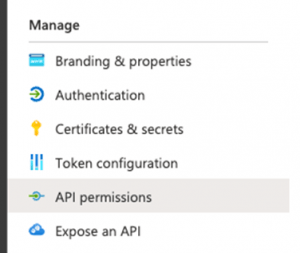
- In the menu click on API Permissions
- Click on + Add a permission
- Select Microsoft Graph and select Application permissions
- Search and add the following permissions
DeviceManagementServiceConfig.Read.All
DeviceManagementServiceConfig.ReadWrite.All- Grant admin consent for your organization
- In the menu click on Certificates & Secrets
- Click on + New Client secret
- Set a description and the expiry of the secret and click on Add
- Copy the value of the secret, this will be required in part 3
- Go to the overview page and copy the Client ID and Tenant ID, those are also required in part 3
Part 2 – Create Microsoft List
- Open portal.office.com
-
- Click on the menu button (image)
- Click on SharePoint (if you are missing the SharePoint button click on all apps)
- Open an existing SharePoint Site (if you don’t have a site, create one via creating site button)
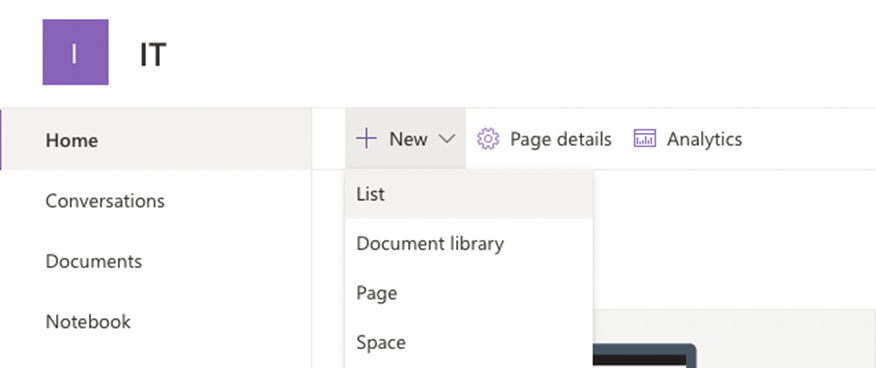
- Click on the + new button
- Select List
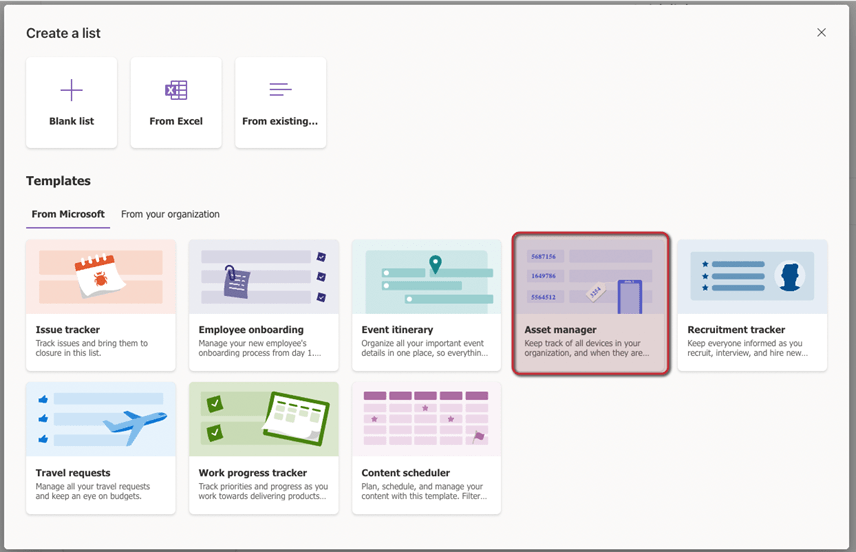
- Open the Asset Manager Template
- Click on the Use Template button
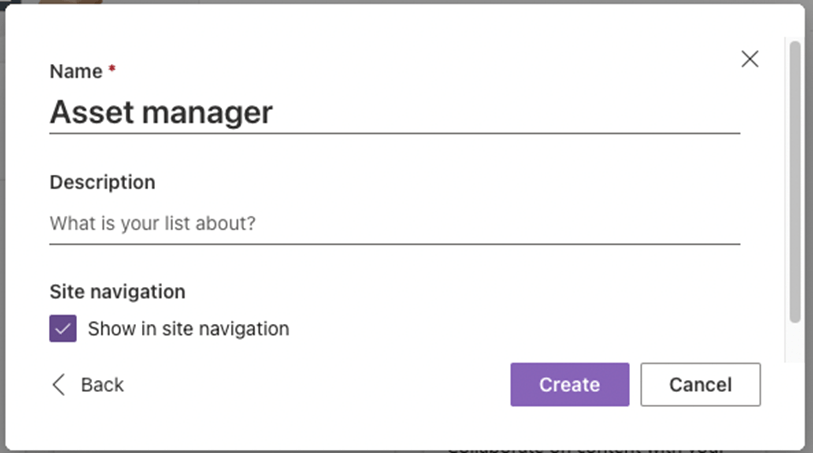
- Fill in a name and a Description for the Microsoft list.
- Click on Create and your new Microsoft List is created.
- Scroll to the last column and click on the + Add column.
(If you want to hide columns click on Show/hide columns) - Click on the Single line of text option
- Create the following columns
| Name | AutoPilot ID |
| Description | |
| Type | Single line of text |
| Default Value |
| Name | GroupTag |
| Description | |
| Type | Single line of text |
| Default Value |
Part 3 – Create Azure Logic App
Note. Rename every Azure Logic App action to match the screenshots!
- Open portal.azure.com
- Search for Logic App
- Click on + Add
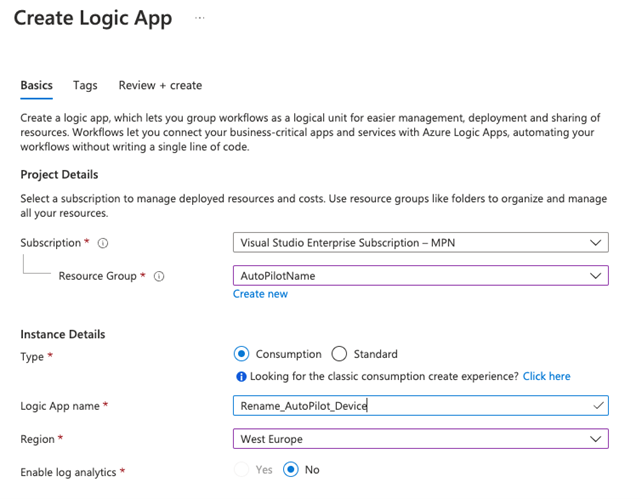
- Select an existing Resource Group or create a new Resource Group
- Select the instance Type (I have chosen Consumption because it is cheaper to use and it’s only one flow. See Azure Calculator)
- Select your region and click on Review + Create
- Check the details on the Review + Create page and click on Create
- After the deployment is completed, go to your new Logic App via Go to Resource button
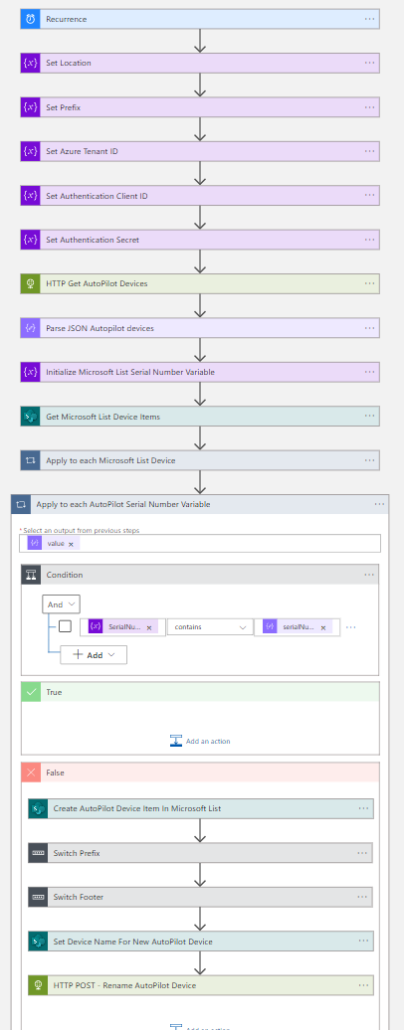
- The first step of the workflow is the Recurrence trigger, based on the desired interval.
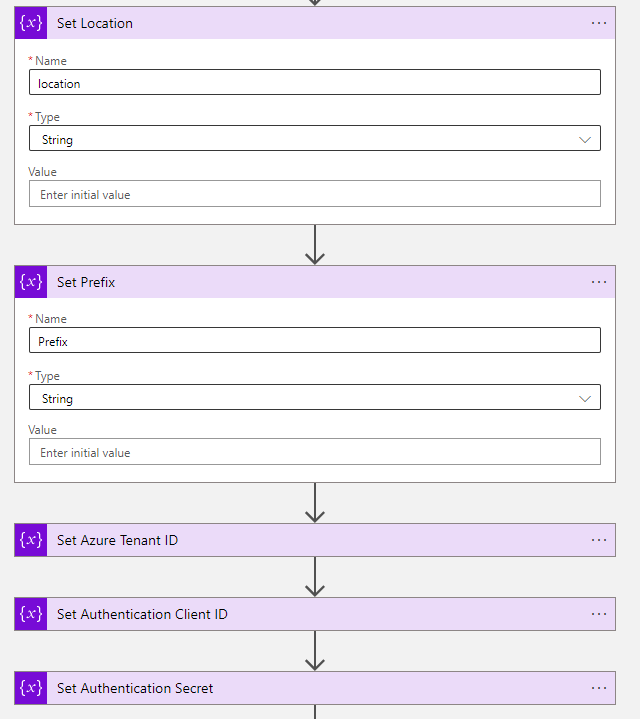
- The next five steps of the workflow are to initialize variables.
| Name | Type | Value | |
|---|---|---|---|
| Set Location | location | String | |
| Set Prefix | Prefix | String | |
| Set Azure Tenant ID | TenantID | String | {Paste the Tenant ID that you have copied in part 1} |
| Set Authentication Client ID | ClientID | String | {Paste the Client ID that you have copied in part 1} |
| Set Authentication Secret | Secret | String | {Paste the secret that you have copied in part 1} |
- The next step is to get all AutoPilot devices via a HTTP Get request
| Method | Get |
| Authentication Type | Active Directory OAuth |
| Tenant | @{variables(‘TenantID’)} |
| Audience | https://graph.microsoft.com |
| Client ID | @{variables(‘ClientID’)} |
| Credential Type | Secret |
| Secret | @{variables(‘Secret’)} |
URI:
https://graph.microsoft.com/beta/deviceManagement/windowsAutopilotDeviceIdentities/- Now we must parse the returned Autopilot devices info into separate outputs via Parse JSON function
Content: @{body(‘HTTP_Get_AutoPilot_Devices’)}
Schema:
{
    "type": "object",
    "properties": {
        "@@odata.context": {
            "type": "string"
        },
        "@@odata.count": {
            "type": "integer"
        },
        "value": {
            "type": "array",
            "items": {
                "type": "object",
                "properties": {
                    "id": {
                        "type": "string"
                    },
                    "deploymentProfileAssignmentStatus": {
                        "type": "string"
                    },
                    "deploymentProfileAssignmentDetailedStatus": {
                        "type": "string"
                    },
                    "deploymentProfileAssignedDateTime": {
                        "type": "string"
                    },
                    "groupTag": {
                        "type": "string"
                    },
                    "purchaseOrderIdentifier": {
                        "type": "string"
                    },
                    "serialNumber": {
                        "type": "string"
                    },
                    "productKey": {
                        "type": "string"
                    },
                    "manufacturer": {
                        "type": "string"
                    },
                    "model": {
                        "type": "string"
                    },
                    "enrollmentState": {
                        "type": "string"
                    },
                    "lastContactedDateTime": {
                        "type": "string"
                    },
                    "addressableUserName": {
                        "type": "string"
                    },
                    "userPrincipalName": {
                        "type": "string"
                    },
                    "resourceName": {
                        "type": "string"
                    },
                    "skuNumber": {
                        "type": "string"
                    },
                    "systemFamily": {
                        "type": "string"
                    },
                    "azureActiveDirectoryDeviceId": {
                        "type": "string"
                    },
                    "azureAdDeviceId": {
                        "type": "string"
                    },
                    "managedDeviceId": {
                        "type": "string"
                    },
                    "displayName": {
                        "type": "string"
                    }
                },
                "required": [
                    "id",
                    "deploymentProfileAssignmentStatus",
                    "deploymentProfileAssignmentDetailedStatus",
                    "deploymentProfileAssignedDateTime",
                    "groupTag",
                    "purchaseOrderIdentifier",
                    "serialNumber",
                    "productKey",
                    "manufacturer",
                    "model",
                    "enrollmentState",
                    "lastContactedDateTime",
                    "addressableUserName",
                    "userPrincipalName",
                    "resourceName",
                    "skuNumber",
                    "systemFamily",
                    "azureActiveDirectoryDeviceId",
                    "azureAdDeviceId",
                    "managedDeviceId",
                    "displayName"
                ]
            }
        }
    }
}- The next step is to create an array variable via the Initialize variable operation
| Initialize Microsoft List Serial Number Variable | |
|---|---|
| Name | SerialNumberMicrosoftList |
| Type | Array |
- The next step is to get the Microsoft List items via Get items.
- Click on the Sign in button and log in with an account that has read/write access to the Microsoft List you created in Part 1.
I have selected my admin account - Select the SharePoint List Site Address and the Microsoft List you have created in Part 1
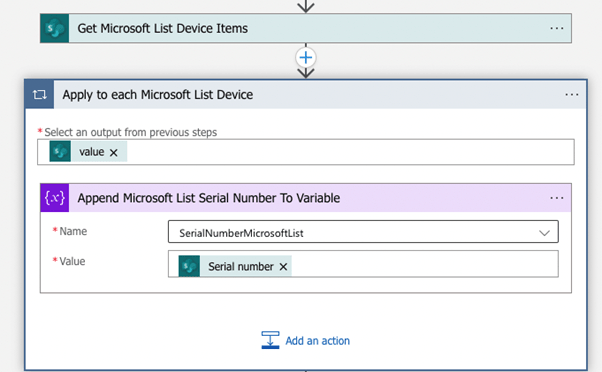
- Create again a For each loop and select the value output of the Get Microsoft List Device Items
- Now it is time to fill the last array variable SerialNumberMicrosoftList with the Serial number value of the Microsoft List via an Append to array variable
- Time to do some magic and compare both data sources.
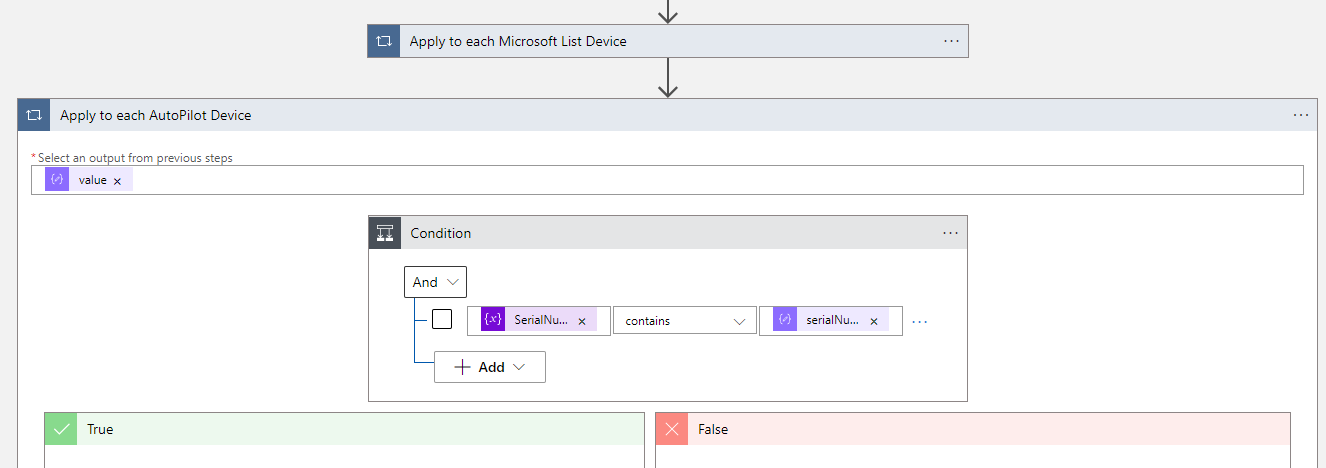
- Create a new step with a For each action, and select the value of the Parse JSON Autopilot devices action
- Add the Condition action to the Apply to each AutoPilot Serial Number Variable loop.
- Set the condition: variable SerialNumberMicrosoftList contains serialNumber (@items(‘Apply_to_each_AutoPilot_Serial_Number_Variable’)?[‘serialNumber’])
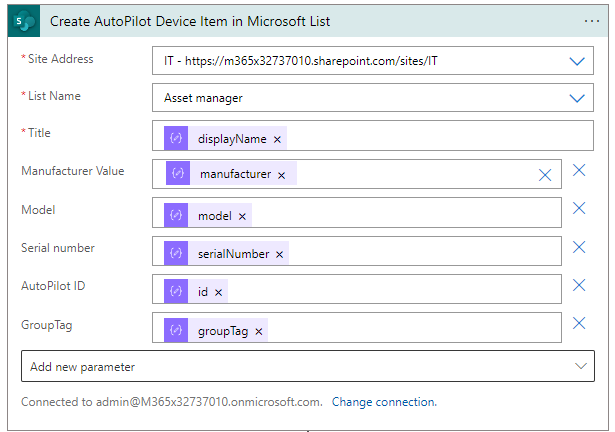
- Add Create Item action in the False part of the condition
- Select the correct SharePoint Site Address and list name
- Click on Add new parameter button and add the following parameters:
-
- Manufacturer Value
- Model
- Serial Number
- AutoPilot ID
- GroupTag
- Set per parameter the following dynamic Apply to each AutoPilot Device content:
Title:
@{items('Apply_to_each_AutoPilot_Device')?['displayName']}

Manufacturer:
@items('Apply_to_each_AutoPilot_Device')?['manufacturer']

Model:
@{items('Apply_to_each_AutoPilot_Device')?['model']}

Serial number:
@{items('Apply_to_each_AutoPilot_Device')?['serialNumber']}

AutoPilot ID:
@{items('Apply_to_each_AutoPilot_Device')?['id']}

Grouptag:
@{items('Apply_to_each_AutoPilot_Device')?['groupTag']}- After the Create AutoPilot Device Item In Microsoft List action we must add a Switch action to set the right Prefix.
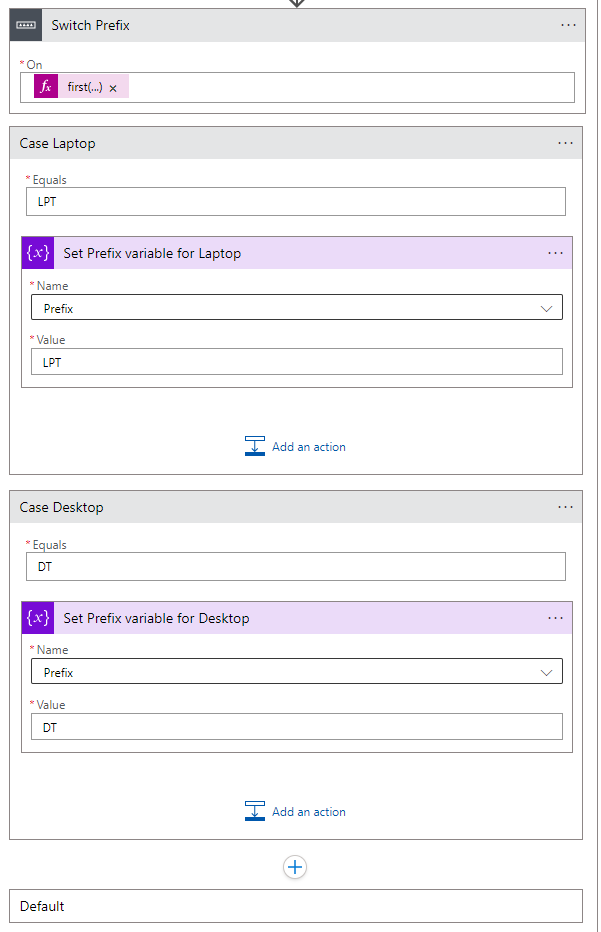
- set the following expression to the on field of the Switch Prefix action
first(skip(split(items('Apply_to_each_AutoPilot_Serial_Number_Variable')?['groupTag'],'_'),1))- Create two cases in the Switch Prefix action
- One Case Laptop that equals to LPT and one Case Desktop that equals to DT
- Create in both cases a set variable action, select the Prefix variable and set your prefix. E.g., Laptop -> LPT, Desktop -> DT
- Leave the default case as-is
- After the Switch Prefix create another Case action. This time for the Footer
- Set the following expression to the on field of the Switch Footer action
first(split(items('Apply_to_each_AutoPilot_Serial_Number_Variable')?['groupTag'],'_'))- After the Switch Prefix create another Case action. This time for the Footer
- Create for every entity a case in the Case Footer action. E.g., Create two cases (Belgium and the Netherlands)
- One Case Belgium that equals to BE and one Case Netherlands that equals to NL
- Create in both cases a set variable action, select the location variable and set your entity code. E.g., Belgium -> BE, Netherlands-> NL
- This time we create a set variable action in the default case as well. Select the location variable and set your global code. E.g., Global -> GLB
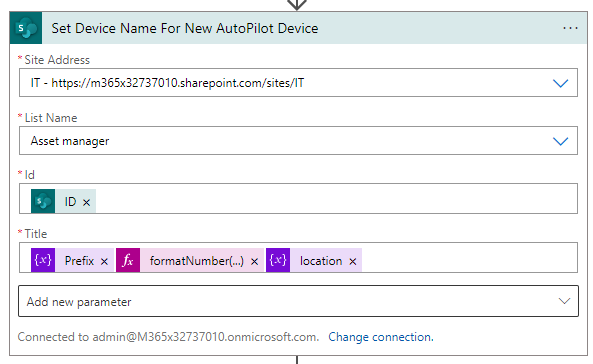
- Now it is time to set the correct name for the AutoPilot device based on the SharePoint List ID. Create an Update item
- Select the same Site Address and List name.
- Configure the ID property of the Create AutoPilot Device Item in Microsoft List action:
@{body('Create_AutoPilot_Device_Item_In_Microsoft_List')?['ID']}- Fill in the Title field with your naming convention. E.g., {Prefix}{Number}{Location} (LPT001NL or DT029BE)
@{variables('Prefix')}@{formatNumber(body('Create_AutoPilot_Device_Item_In_Microsoft_List')?['ID'],'000','en-us')}@{variables('location')}- The name is set correctly within Microsoft List
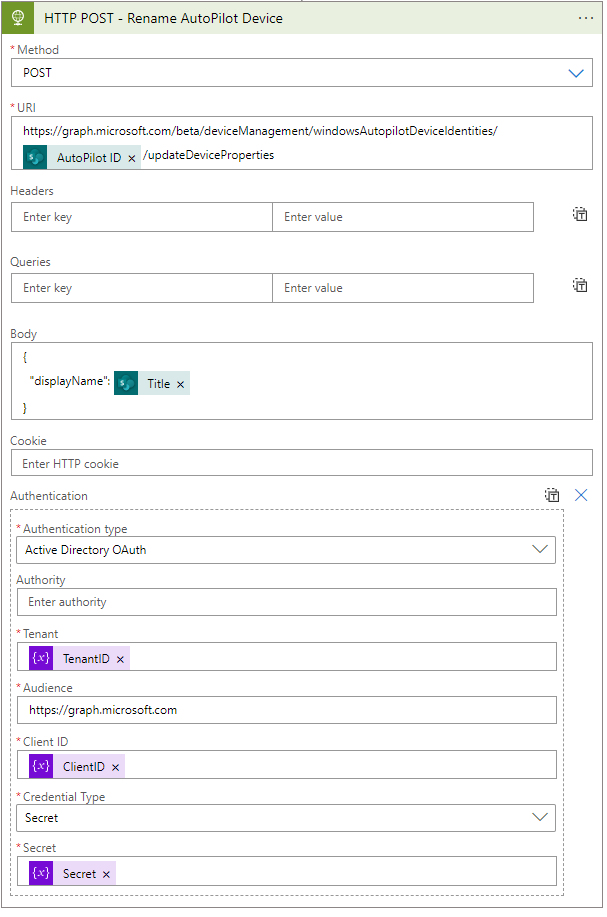
- Let’s synchronize the Microsoft List with Autopilot. Create a new HTTP action with following settings
| Method | POST |
| Body | { “displayName”: @{body(‘Set_Device_Name_For_New_AutoPilot_Device’)[‘Title’]} } |
| Authentication Type | Active Directory OAuth |
| Tenant | @{variables(‘TenantID’)} |
| Audience | https://graph.microsoft.com |
| Client ID | @{variables(‘ClientID’)} |
| Credential Type | Secret |
| Secret | @{variables(‘Secret’)} |
URI:
https://graph.microsoft.com/beta/deviceManagement/windowsAutopilotDeviceIdentities/@{body('Set_Device_Name_For_New_AutoPilot_Device')?['AutoPilotID']}/updateDeviceProperties- Save the Logic App and Click on Run Trigger












 Hi! My name is René Laas. I have passion and enthusiasm for the Microsoft 365 Cloud. I am based in the Netherlands.
 Amador Loureiro
Leave a Reply
Want to join the discussion?Feel free to contribute!