Automate your retire actions and report
Published: August 18, 2023 | Author: René Laas
The purpose of this blog post is to inform you how to generate a weekly report of your Intune-managed devices that are ready to retire and send an e-mail to their manager
This blog post is part of a series of several blogs about compliance. In my previous blog posts, I explained already a lot about compliance with Microsoft Intune.
- A method to designing an effective compliance policy design
Why do you even need a compliance policy, which stakeholder do you need, configuration options, etc.? - how to roll out your compliance policy
Which strategy can you use to roll out your compliance policy, in this blog post I explained some examples. - Configure compliance policies with Microsoft Intune
Besides your design and roll-out strategy, you must configure your policy, in this blog post I explained how to configure it with Intune. - Custom compliance policy script with multiple checks
To check on extra compliance settings that are not by default available you can use a PowerShell script, in this blog post I will explain how to configure this with multiple checks in one script. - how to configure a custom compliance policy script with multiple checks
In this blog post, I will explain how to configure your supported Windows build in a compliance policy in an automated way. - Retire or do not retire your devices!
In this blog post, I will dive a little bit deeper into the add a device to retire list option, and how to abuse this list. Of course, you can use the non-compliant report and use a filter, but you can’t filter on devices that are part of a specific compliant policy.
I have noticed that a lot of organizations are struggling with the governance of their device and compliant / non-compliant devices. Usually, the processes are not well set up or watered down. In this blog post, I will explain how to generate a weekly report and send an e-mail to the end user their manager to take action and investigate why is the user not using the laptop. This can help the organization to get the laptops back and not have to buy new laptops.
Requirements:
Graph API Permissions:
Noncompliant Retire devices list
You can check every day, week, or month your non-compliant device and perform manually some actions like retire or delete. This will have a major impact on the workload of your Intune admins. So lucky for us Microsoft has developed the non-compliant action.
The retire noncompliant device list is an overview of all your devices that are not compliant and met the configured threshold in your compliance policy. For example, after 30 days of non-compliant, the device will be added to that list.
To get more in control of your non-compliant devices, for example, you can use it for your personally enrolled devices, or you can abuse this option perfectly for other purposes like getting in control.
Instead of doing a lot of manual tasks and checks, you have already an overview of devices that are not compliant for an X number of days within only a few clicks, and it will be updated automatically.
Now you can use this list as a source of truth and send automatically an e-mail to the manager of the device user, and let them figure out why the device is on the list and the needed actions.
Let start with the registration of the application API permissions
Note. In this example, I have used an App registration with App secret. Keep in mind this is not the most securest way to connect to the Graph API. For production environments please use a managed identity of Certificate.
- Open azure.com
- Click on Azure Active Directory
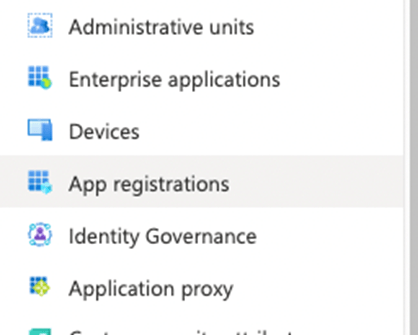
- Click on App Registration in the left menu
Or use the following link Active Directory | App Registration
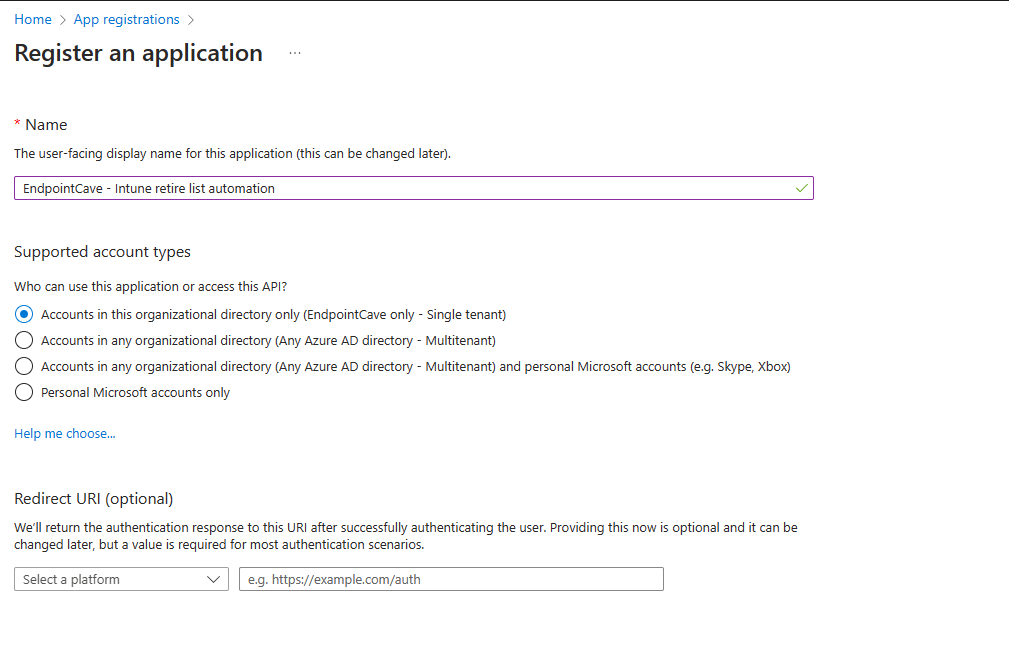
- Click on + New registration
- Configure an app name e.g., EndpointCave – Intune retire list automation
- Click on the Register button, and the app will be created and automatically opened.
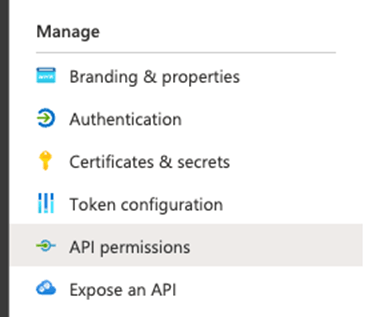
- In the menu click on API Permissions
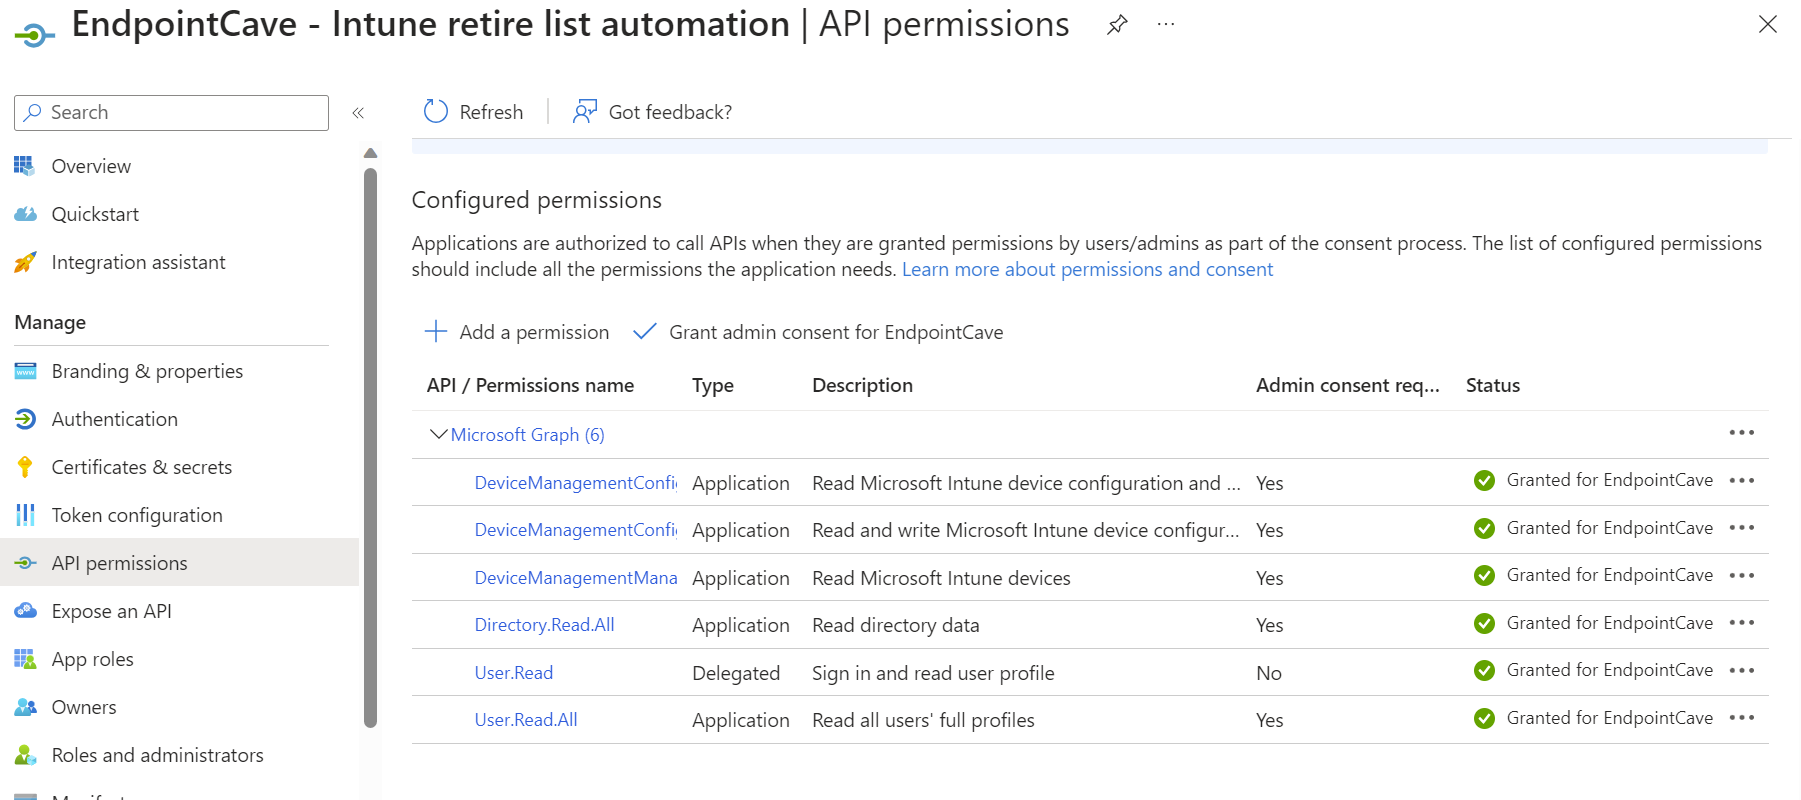
- Click on+ Add a permission
- Select Microsoft Graph and select Application permissions
- Search and add the following permissions
DeviceManagementConfiguration.Read.All
DeviceManagementConfiguration.ReadWrite.All
DeviceManagementManagedDevices.Read.All
Directory.Read.All
User.Read.All- Grant admin consent for your organization
- In the menu click on Certificates & Secrets
- Click on + New Client secret
- Set a description and the expiry of the secret and click on Add
- Copy the value of the secret,
- Go to the overview page and copy the Client ID and Tenant ID
Let start Automate your retire actions and report via an Azure Logic App
Note. Rename every Azure Logic App action to match the screenshots!
- Open azure.com
- Search for Logic App
- Click on + Add
- Select an existing Resource Group or create a new Resource Group
- Select the instance Type (I have chosen Consumption, but check the Azure Calculator which option fits your environment)
- Select your region and click on Review + Create
- Check the details on the Review + Create page and click on Create
- After the deployment is completed, go to your new Logic App via Go to Resource button
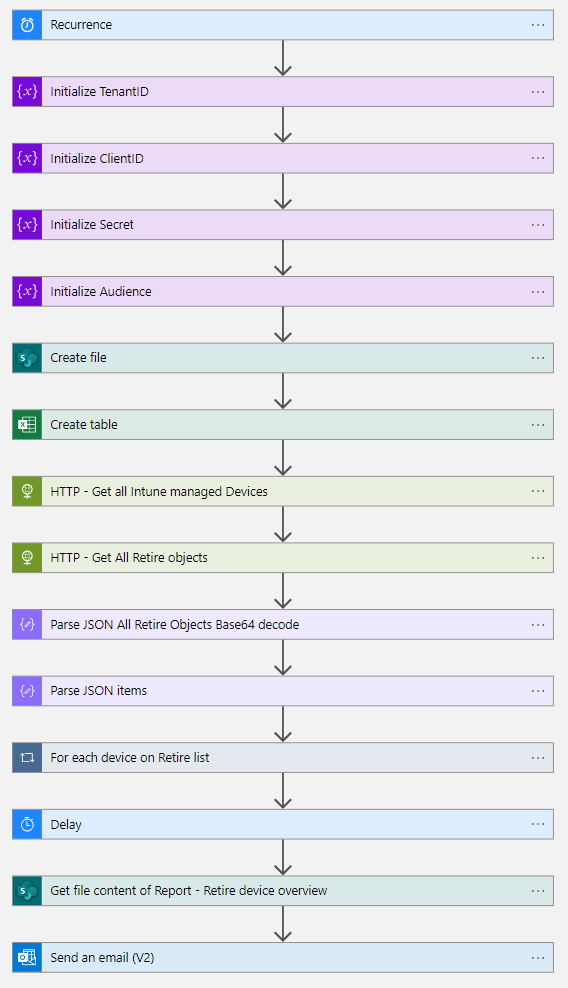
- The first step of the workflow is the Recurrence trigger, based on the desired interval
Note. I have used a weekly interval in this blog.
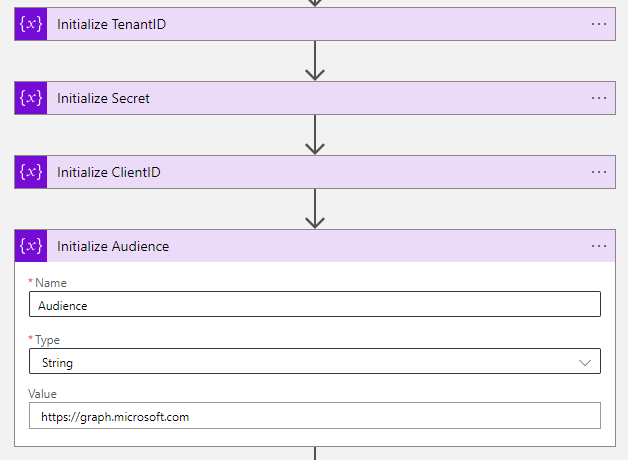
- The next four steps of the workflow are to initialize variables.
| Name | Type | Value | |
|---|---|---|---|
| Initialize TenantID | TenantID | String | {Paste your Tenant ID} |
| Initialize ClientID | ClientID | String | {Paste your Client ID} |
| Initialize Audience | Audience | String | https://graph.microsoft.com |
| Initialize Secret | Secret | String | {Paste your Secret} |
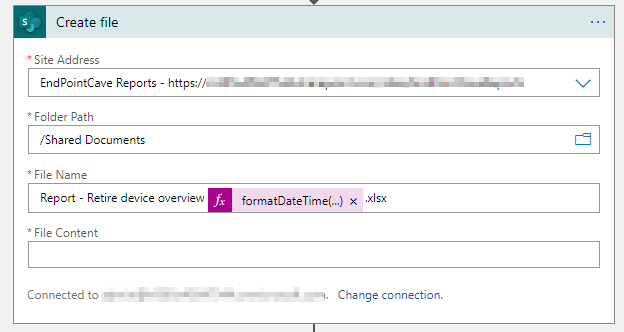
- The first action after the four variables is the create file action. To create an Excel file on SharePoint.
| Setting | Value |
|---|---|
| Site Address | {enter team site or SharePoint URL} |
| Folder Path | /Shared Documents |
| File Name | Report – Retire device overview @{formatDateTime(utcNow(), ‘dd-MM-yyyy’)}.xlsx |
| File Content | {enter space} |
- After the Create file action, you need to add a Create table action. With this action, you will create a table in the Excel file.
| Setting | Value |
|---|---|
| Location | {enter team site or SharePoint URL} |
| Document Library | Documents |
| File | @body(‘Create_file’)?[‘Id’] |
| Table range | A1:I1 |
| Columns names | User,AadDeviceId,ComplianceState,DeviceName,DeviceId,OS,OwnerType,PolicyName,RetireAfterDatetime |
| Table name | Devices |
- Now it is time to get all the data from the Microsoft Graph API
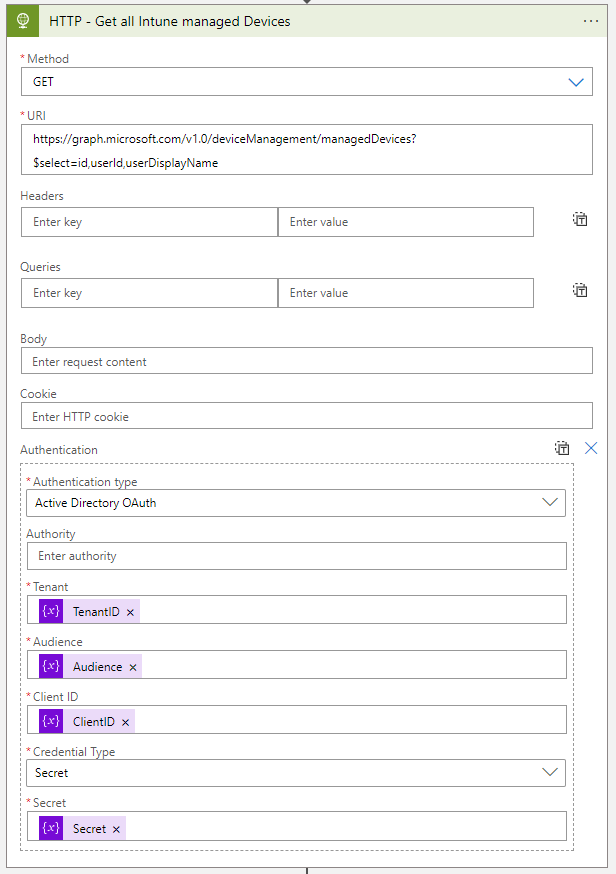
- Add an HTTP action.
URI:
https://graph.microsoft.com/v1.0/deviceManagement/managedDevices?$select=id,userId,userDisplayName| Setting | Value |
|---|---|
| Method | Get |
| Authentication type | Active Directory OAuth |
| Tenant | @{variables(‘TenantID’)} |
| Audience | @{variables(‘Audience’)} |
| Client ID | @{variables(‘ClientID’)} |
| Credential Type | Secret |
| Secret | @{variables(‘Secret’)} |
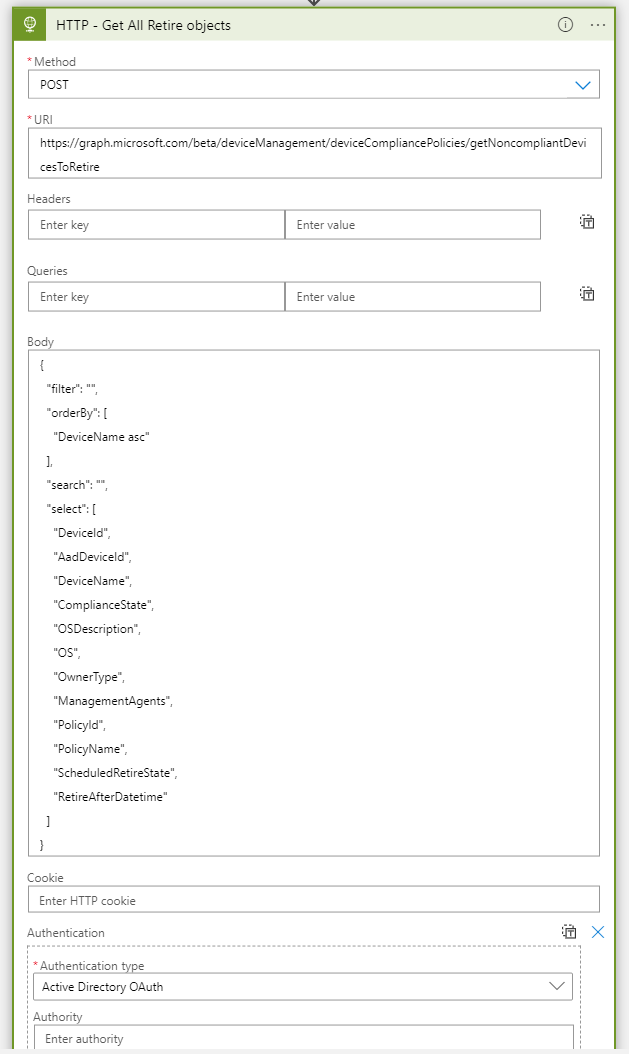
- After the HTTP – Get all Intune managed Devices action, create another HTTP action.
URI:
https://graph.microsoft.com/beta/deviceManagement/deviceCompliancePolicies/getNoncompliantDevicesToRetireBody:
{
  "filter": "",
  "orderBy": [
    "DeviceName asc"
  ],
  "search": "",
  "select": [
    "DeviceId",
    "AadDeviceId",
    "DeviceName",
    "ComplianceState",
    "OSDescription",
    "OS",
    "OwnerType",
    "ManagementAgents",
    "PolicyId",
    "PolicyName",
    "ScheduledRetireState",
    "RetireAfterDatetime"
  ]
}| Setting | Value |
|---|---|
| Method | POST |
| Authentication type | Active Directory OAuth |
| Tenant | @{variables(‘TenantID’)} |
| Audience | @{variables(‘Audience’)} |
| Client ID | @{variables(‘ClientID’)} |
| Credential Type | Secret |
| Secret | @{variables(‘Secret’)} |
- Now you have all the needed information, it is time to do some magic.
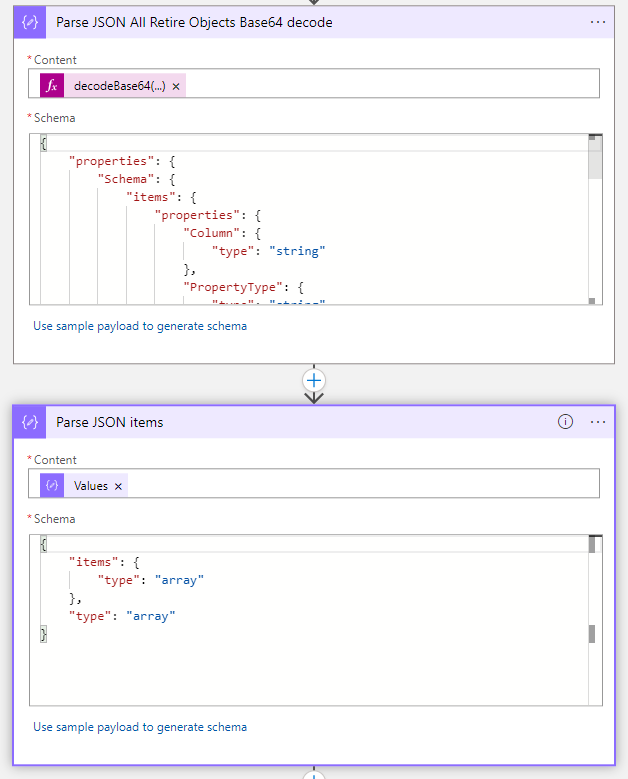
- The content from the HTTP – Get All Retire objects action is Base64 encoded. This needs to be decoded and needs to be parsed.
- Create a Parse JSON Action
Content:
@{decodeBase64(body('HTTP_-_Get_All_Autopilot_objects')?['$content'])}Schema:
{
    "properties": {
        "Schema": {
            "items": {
                "properties": {
                    "Column": {
                        "type": "string"
                    },
                    "PropertyType": {
                        "type": "string"
                    }
                },
                "required": [
                    "Column",
                    "PropertyType"
                ],
                "type": "object"
            },
            "type": "array"
        },
        "SessionId": {
            "type": "string"
        },
        "TotalRowCount": {
            "type": "integer"
        },
        "Values": {
            "items": {
                "type": "array"
            },
            "type": "array"
        }
    },
    "type": "object"
}- After the Parse JSON All Retire Objects Base64 decode, Create another Parse JSON Action
Content:
@{body('Parse_JSON_All_Retire_Objects_Base64_decode')?['Values']}Schema:
{
    "items": {
        "type": "array"
    },
    "type": "array"
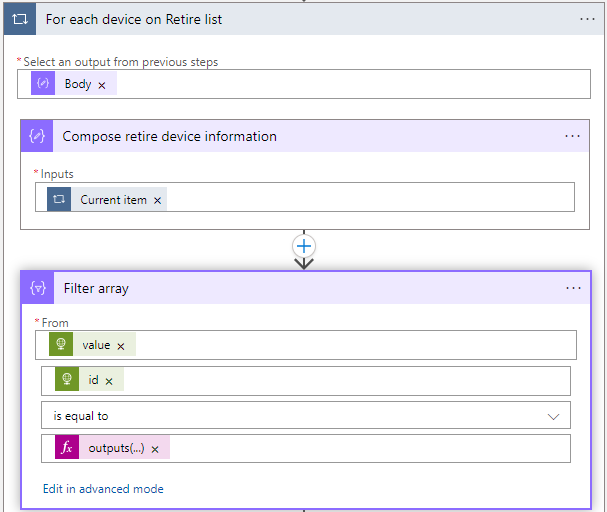
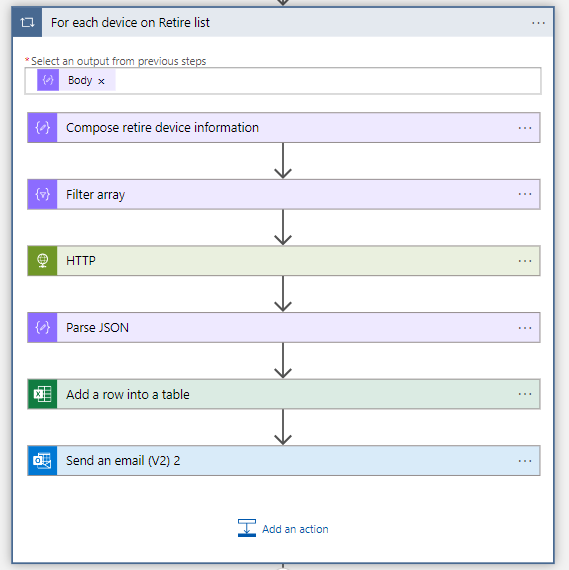
}- Now you have the correct information available. Create a for each loop with the output of the Body property of the Parse JSON items action.
- Within the For each device on Retire list loop, a Compose action with the following input:
@{items('For_each_device_on_Retire_list')}- After the Compose retire device information action, create a filter action with the following information:
| Field | Value |
|---|---|
| From | @body(‘HTTP_-_Get_all_Intune_managed_Devices’)?[‘value’] |
| Choose a value | @item()?[‘id’] |
| Is equal to | |
| Choose a value | @outputs(‘Compose_retire_device_information’)[3] |
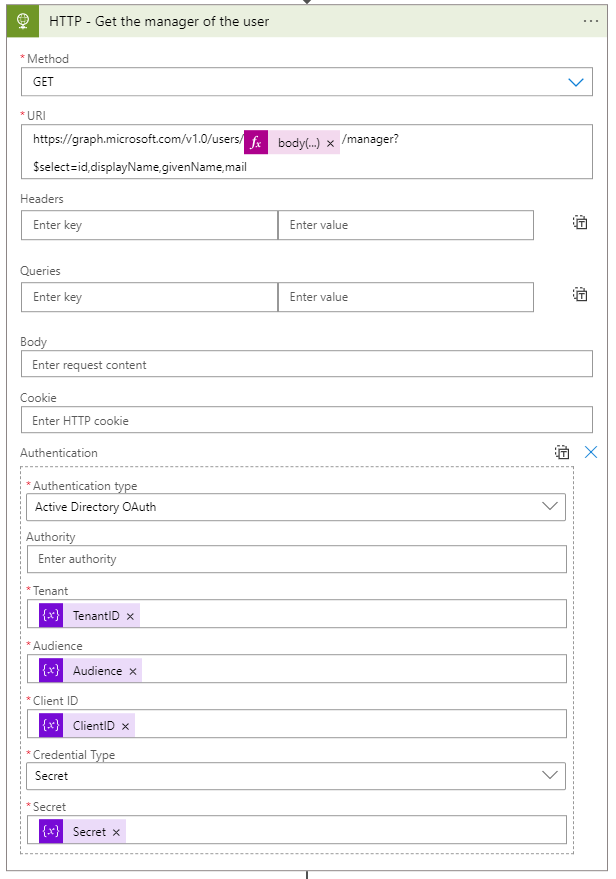
- After the Filter array action, create an HTTP action to Get the manager of the user
URI:
https://graph.microsoft.com/v1.0/users/@{body('Filter_array')?[0]?['userId']}/manager?$select=id,displayName,givenName,mail| Setting | Value |
|---|---|
| Method | Get |
| Authentication type | Active Directory OAuth |
| Tenant | @{variables(‘TenantID’)} |
| Audience | @{variables(‘Audience’)} |
| Client ID | @{variables(‘ClientID’)} |
| Credential Type | Secret |
| Secret | @{variables(‘Secret’)} |
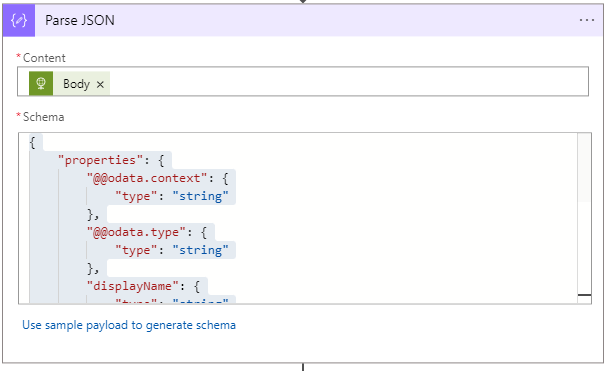
- After the HTTP – Get the manager of the user action, you need to parse the body of the content.
- Create a Parse JSON action, select the Body property of the HTTP – Get the manager of the user action as the content
Schema:
{
    "properties": {
        "@@odata.context": {
            "type": "string"
        },
        "@@odata.type": {
            "type": "string"
        },
        "displayName": {
            "type": "string"
        },
        "givenName": {
            "type": "string"
        },
        "id": {
            "type": "string"
        },
        "mail": {
            "type": "string"
        }
    },
    "type": "object"
}- Now it is time to put the data in the table for IT.
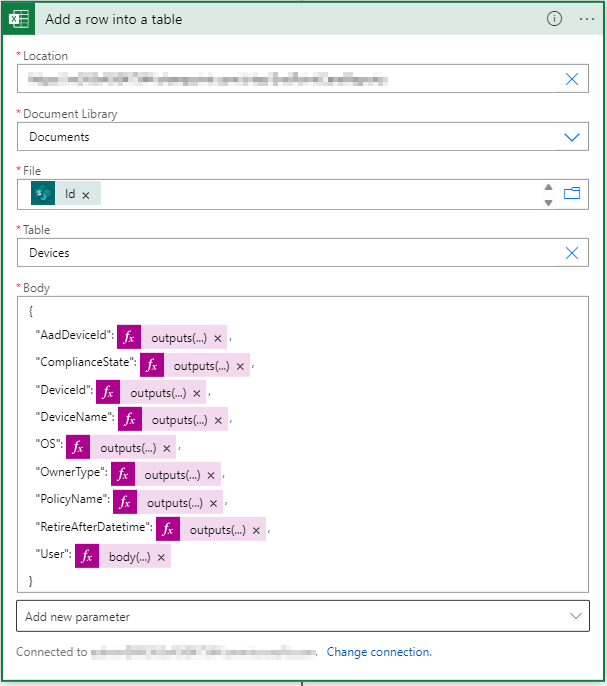
- Create an Add a row into a table action.
Body:
{
  "AadDeviceId": @{outputs('Compose_retire_device_information')[0]},
  "ComplianceState": @{outputs('Compose_retire_device_information')[2]},
  "DeviceId": @{outputs('Compose_retire_device_information')[3]},
  "DeviceName": @{outputs('Compose_retire_device_information')[4]},
  "OS": @{outputs('Compose_retire_device_information')[8]},
  "OwnerType": @{outputs('Compose_retire_device_information')[10]},
  "PolicyName": @{outputs('Compose_retire_device_information')[12]},
  "RetireAfterDatetime": @{outputs('Compose_retire_device_information')[13]},
  "User": @{body('Filter_array')?[0]?['userDisplayName']}
}| Setting | Value |
|---|---|
| Location | {enter team site or SharePoint URL} |
| Document Library | Documents |
| File | @body(‘Create_file’)?[‘Id’] |
| Table | Devices |
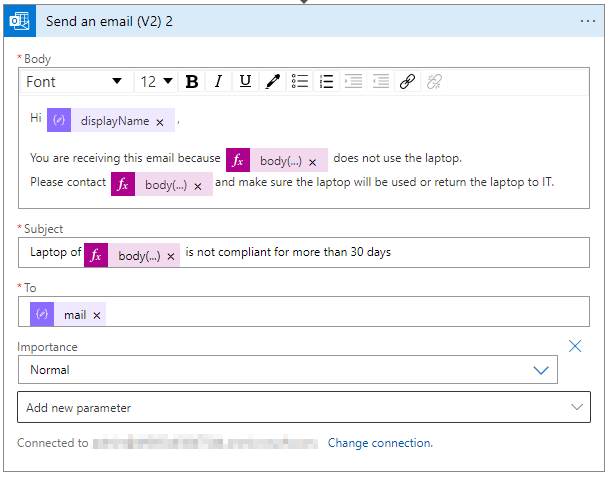
- Now you have the information in Excel. Create a Send an Email (V2) action to send an email to the manager.
- Enter the text and subject
- Select the mail property of the HTTP – Get the manager of the user action
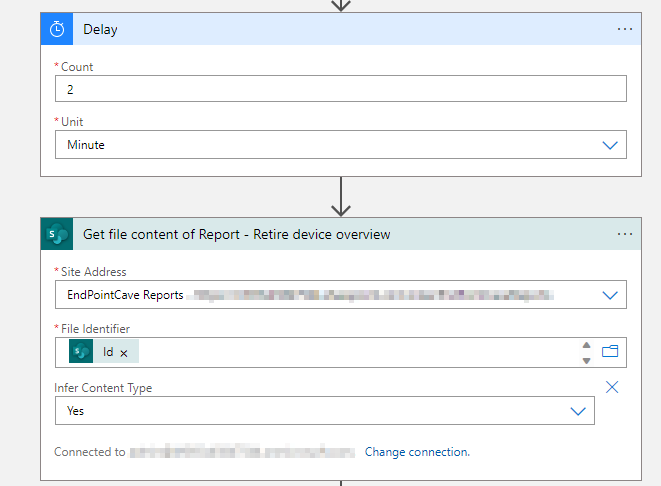
- The next step is outside the For each device on Retire list loop. Create a Delay action.
- Configure a 2 minutes delay, so you are sure all the for each loop actions have been performed and all the data is in de Excel file.
- After the Delay action. Create a Get file content action.
| Setting | Value |
|---|---|
| Site Address | {enter team site or SharePoint URL} |
| File Identifier | @body(‘Create_file’)?[‘Id’] |
| Infer Content Type | Yes |
- Now you have the file content of the Get file content of Report – Retire device overview action, you can send this to IT.
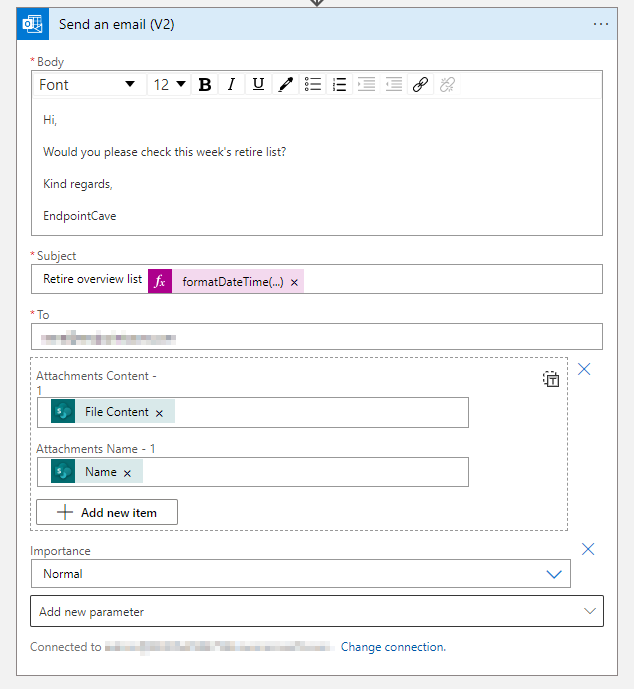
- Create another Send an email (V2) action.
- Enter the content of the email in the body field and enter a subject.
- Select the receiver in the To field and click on Add new parameter and select Attachments
| Setting | Value |
|---|---|
| Attachments Content -1 | @body(‘Get_file_content_of_Report_-_Retire_device_overview’) |
| Attachments Name – 1 | @body(‘Create_file’)?[‘Name’] |










Hi, Thanks for the detailed steps. I am having a challenge at the ‘for each device retire list’ flow. The filter array; from field doesnt convert to a dynamic content/expression when i copy and paste the value. So i had to use a dynamic expression: body(‘HTTP_-_Get_all_Intune_managed_Devices’)?[‘value’] which shows as a function.
Also. the output ‘outputs(‘Compose_retire_device_information’)[3]’, when i try to save it, i get this error ‘Failed to save logic app DeviceRetireNotification. The template validation failed: ‘The action(s) ‘Compose_retire_device_information’ referenced by ‘inputs’ in action ‘Filter_array’ are not defined in the template.’
please what am i missing?
did you use the correct name in the actions that are being used? IF it is not the same name it will not work.
For example if you are using the following expression: outputs(‘Compose_retire_device_information’)[3], One of the action before this action should be named “Compose retire device information”
What also could be the problem is the quotes in the expression: outputs(‘Compose_retire_device_information’)[3]. It look like this are different one as ”. This can happen because of the font of my blog.
Hi Rene,
I was reading your blog, which is very nice, but I missed parts about the Compose Excel File and the for each Compose retire device information.
Both can be seen in your entire flow screenshot, but not in your logic app explanation.
Hi Dennie,
I need to update my entire flow screenshot. I thought creating a compose action with the content of an empty Excel file was required, but that is not needed. So, I removed that action and updated my blog but I had forgotten to update the entire flow screenshot.
So if you enter the spacebar in the content field of the create file action it will work without the compose excel file action.
Kind regards,
Rene
what about the compose retire device information
Hi, I have updated the blog, excuse me that I didn’t see that