Custom compliance policy script with multiple checks for Windows devices
Published: June 25, 2023 | Author: René Laas
The purpose of this blog post is to inform you how to configure multiple custom compliance checks and how to configure them with Intune
In my previous blog post, I explained how to design your compliance policy. Why do you even need a compliance policy, which stakeholder do you need, configuration options, etc? In my other blog post, I explained how to roll out your compliance policy and a strategy that you can use and How to configure compliance policies with Microsoft Intune.
This blog post will be more technical and manual, you will learn how to configure custom compliance policies and how to create your Compliance checks and script.
Requirements:
Configuration options
To use a custom compliance policy script, you have a few requirements that you must configure in Intune. A Compliance policy, of course, is a custom compliance policy PowerShell script, named in the compliance policy as a discovery script and a validation file. A little cumbersome in my opinion, but it is what it is.
Compliance policy
These policies are designed to enforce security and compliance standards. Ensuring that the device meets the organization’s requirements. They enable organizations to set up and enforce specific rules and configurations, such as enforcing passcode complexity, encrypting data, and restricting access to certain apps or features. By implementing Intune compliance policies, organizations can strengthen their overall security posture, maintain regulatory compliance, and safeguard their data from unauthorized access or misuse.
To configure a custom compliance check you must use a compliance policy. This can be an existing one or you can create a new compliance policy.
Custom compliance policy script (discovery script)
The custom compliance policy PowerShell script, also known as the discovery script, is a powerful tool designed to collect and analyze data to assess and ensure compliance with specific policies and regulations. This script plays a vital role in providing organizations with valuable insights into their compliance posture. By automating the data collection process, the discovery script saves time and effort compared to manual audits, allowing for regular and comprehensive compliance assessments.
By proactively scanning systems, applications, and other data sources, the discovery script helps organizations identify potential compliance gaps, or misconfigurations before they lead to compliance breaches.
The custom compliance policy PowerShell discovery script is an essential tool for organizations to maintain a robust compliance program and mitigate compliance risks effectively.
Custom compliance validation JSON file
The custom compliance validation JSON file serves as a configuration file that outlines the specific compliance requirements and criteria for a given compliance policy. it is a structured JSON file that defines the rules, checks, and conditions that need to be met to be compliant.
The JSON file typically contains a set of key-value pairs, where each key represents a specific compliance rule and the corresponding value defines the conditions or parameters for compliance validation.
So the custom compliance PowerShell script (discovery script) runs and collects the data from the devices. The JSON validation files validate the output of the script with the configured standards and return the status, compliant or non-compliant.
By using the custom compliance validation JSON file and the custom compliance PowerShell script (discovery script), organizations can establish a standardized and scalable approach to compliance management, improving efficiency, and reducing the risk of non-compliance.
Create your Custom Compliance policy Script with multiple checks
Custom compliance policy script (discovery script)
#First compliance check
$BitLockerinfo = (Get-BitLockerVolume -MountPoint $env:SystemDrive).KeyProtector | Where { $_.KeyProtectorType -eq 'TpmPin' }

#Second compliance check
$HyperVInfo = Get-Service -Name vmcompute

#Get output of both compliance checks
$hash = @{
#First compliance check output
"BitLocker PIN" = $BitLockerinfo.KeyProtectorType;
#Second compliance check output
"Hyper-V Service Status" = $HyperVInfo.Status
 }

#Retun and convert both compliance checks
return $hash | ConvertTo-Json -Compress
More information about the JSON file can be found here
Custom compliance validation JSON file
| Value | Explanation |
|---|---|
| SettingName | Must be the same name as the name in the discovery script |
| Operator | Represents a specific action that is used to build a compliance rule |
| DataType | The type of data that you can use to build your compliance rule |
| Operand | Represent the values that the operator works on |
| MoreInfoUrl | A URL that’s shown to device users so they can learn more about the compliance requirement when their device is noncompliant for a setting |
| RemediationStrings | Information that gets displayed in the Company Portal when a device is noncompliant to a setting |
{
"Rules":[
    {
       "SettingName":"BitLocker PIN",
       "Operator":"IsEquals",
       "DataType":"Int64",
       "Operand":"4",
       "MoreInfoUrl":"https://endpointcave.com",
       "RemediationStrings":[
          {
             "Language":"en_US",
             "Title":"Bitlocker Startup Pin must be set",
             "Description": " Bitlocker Startup Pin must be set "
          }
       ]
    },
    {
       "SettingName":"Hyper-V Service Status",
       "Operator":"IsEquals",
       "DataType":"Int64",
       "Operand":"4",
       "MoreInfoUrl":"https://endpointcave.com",
       "RemediationStrings":[
          {
             "Language":"en_US",
             "Title":"Hyper-V service is not running",
             "Description": "Please make sure that Hyper-V is enabled, installed and the service is running."
          }
       ]
    },

]
}
How to upload your Custom Compliance policy Script with multiple checks
- Open Microsoft Intune
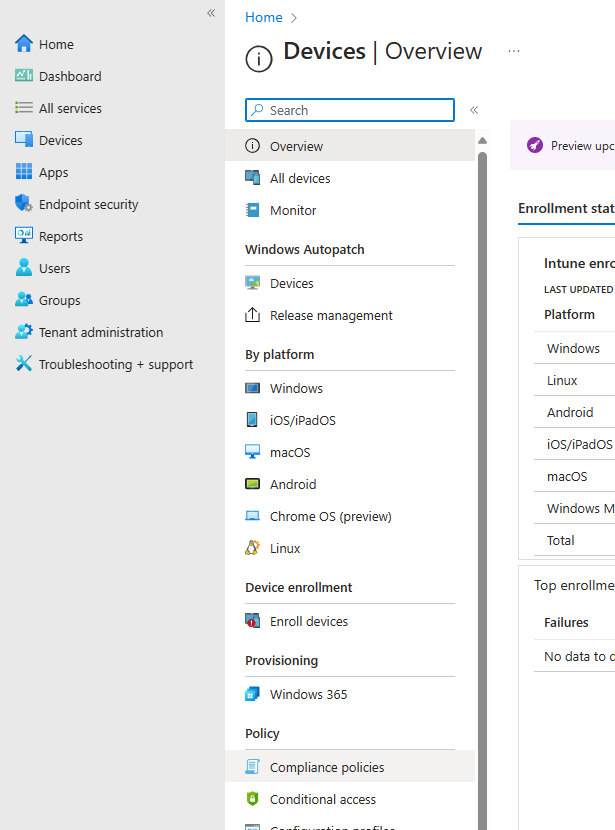
- In the menu select Devices
- In the sub-menu on the left side, scroll down to Policy
- Click on Compliance policies
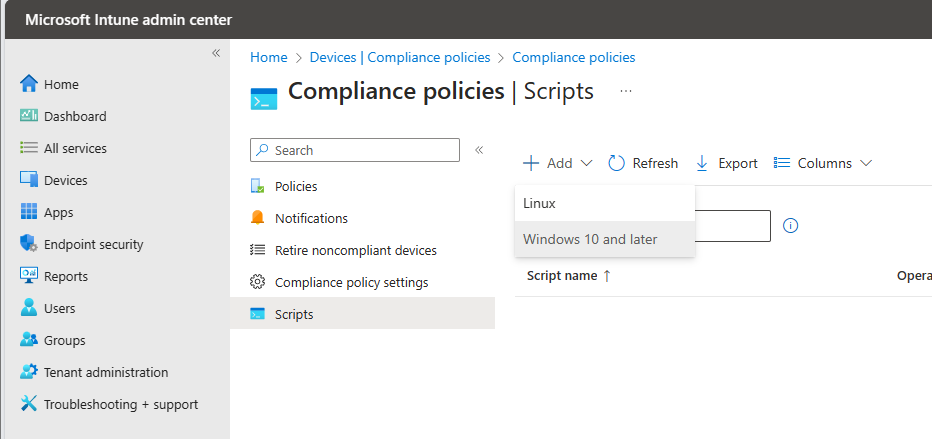
- The submenu will be replaced by a new submenu
- Click on Scripts
- Now we must add the script, click on + add and select Windows 10 and later
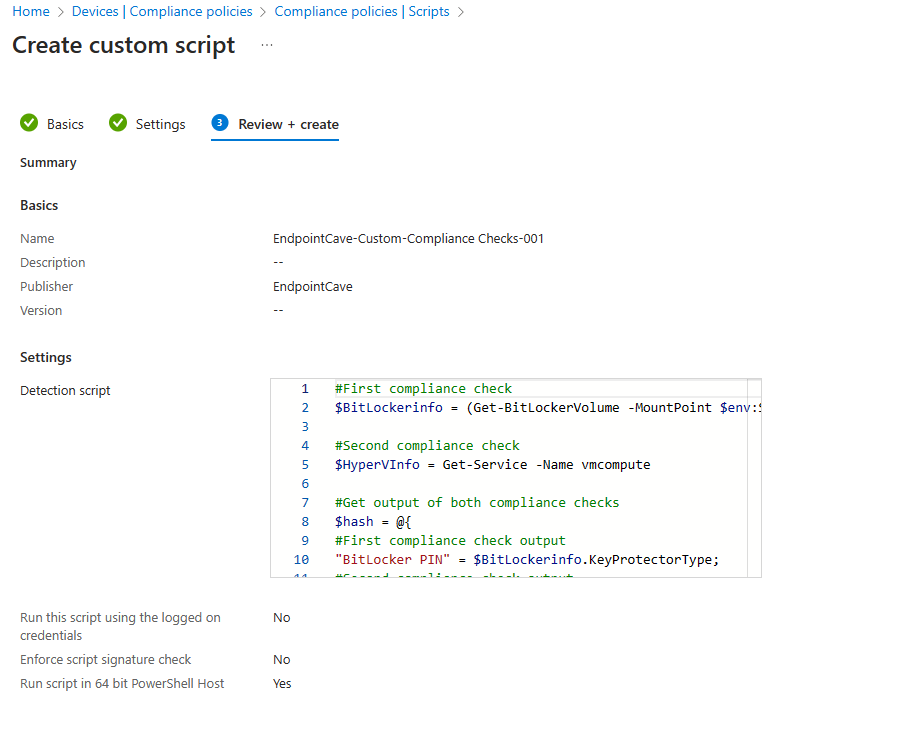
- Enter a name for your compliance notification
- Set a description and publisher if needed and click on Next
- Open your PowerShell script on your device and copy the script
- Paste your script content in the detection script input field
- If your script must run in user mode select the option Run this script using the logged-on credentials
- Enforce your script with a signature if your organization requires this option.
- Select the 64-bit or 32-bit PowerShell host.
- Click on next
- Review your custom script and click on Create
- Now is your script created and ready to be used in a compliance policy
How to use your Custom Compliance policy Script with multiple checks in your compliance policy
- Open Microsoft Intune
- In the menu select Devices
- In the sub-menu on the left side, scroll down to Policy
- Click on Compliance policies
- The submenu will be replaced by a new submenu
- Click on Policies
- Select your existing policy or create a new policy. I will select my existing policy
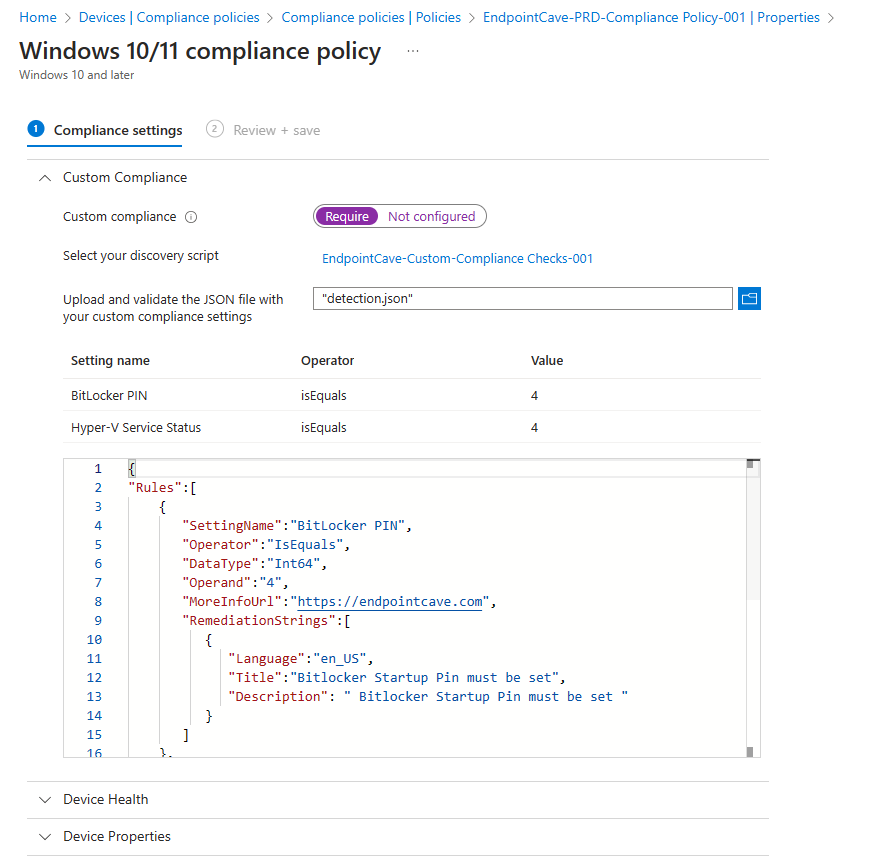
- On the compliance policy screen, select properties.
- Click on the edit button of the Compliance settings section
- Select Custom Compliance
- Enable the toggle of the Custom Compliance section
- Select your custom compliance policy script at the option: Select your discovery script
- Upload your Custom Compliance JSON file
- Click on Review + Save
- Review your compliance policy and click on Save


 Hi! My name is René Laas. I have passion and enthusiasm for the Microsoft 365 Cloud. I am based in the Netherlands.
 Gerd Altmann
 Possessed Photography
Leave a Reply
Want to join the discussion?Feel free to contribute!