Set up the missing naming convention to increment your AutoPilot device names
The purpose of this blog post is to inform you how to configure your AutoPilot naming convention with new variables like incrementing the device number.
I recently had a workshop about the design of AutoPilot. The naming convention of the device came up. By default, AutoPilot can only use the variables %SERIAL% and %RAND:x%. Some customers want to use other naming conventions than Microsoft supports with AutoPilot, for example, increase the device number like LPT-1 and LPT-2, etc. I decided to fix that missing feature. I have created a Microsoft List to inventory the AutoPilot device and a Logic app to automate the process.
Requirements:
License Requirements:
Graph API Requirements:
What is Microsoft AutoPilot?
Windows Autopilot is a collection of technologies used to set up and pre-configure new devices or devices that have been reinstalled or reset and get ready for productive use. AutoPilot automates, changes, and adds screens in the OOBE phase and together with Microsoft Intune, you can give your devices directly to your end-users without the need to do manual tasks, build, maintain, or apply custom operating system images.
More information can be found here
What is Microsoft List?
Microsoft Lists is a Microsoft 365 application that allows you to create simple, intelligent, and flexible lists to help you to organize your work more effectively. Microsoft List is stored on a SharePoint Site and can also be included in Microsoft Teams. Microsoft List can also be used as a data source for automation. With ready-made templates, it is an easy and handy tool to use.
More information can be found here
What is an Azure Logic App?
Azure Logic Apps is a cloud service that helps you schedule, automate, and orchestrate tasks, business processes, and workflows when you need to integrate apps, data, systems, and services across enterprises or organizations. The UI of Azure Logic apps looks similar to PowerAutomate. But PowerAutomate and Azure Logic apps are not the same.
Check out the blog post of Thijs Lecomte to decide what you should use
More information about Azure Logic apps can be found here
How to configure the missing naming convention to increment your AutoPilot device names
Part 1 – Create App Registration
- Open Portal.azure.com
- Click on Azure Active Directory
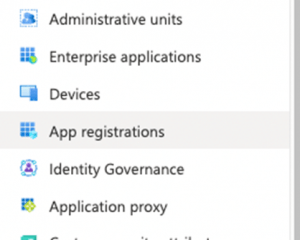
- Click on App Registration in the left menu
Or use the following link Active Directory | App Registration
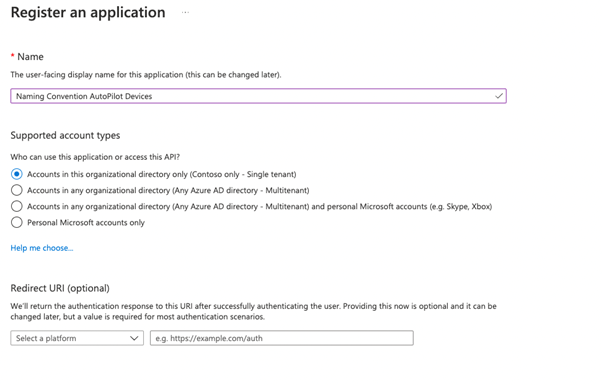
- Click on + New registration
- Configure an app name e.g., Naming Convention AutoPilot Devices
- Click on the Register button, the app will be created and automatically opened.
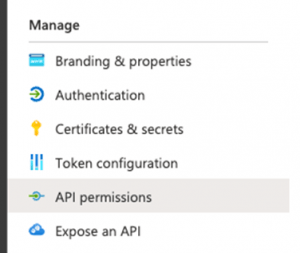
- In the menu click on API Permissions
- Click on + Add a permission
- Select Microsoft Graph and select Application permissions
- Search and add the following permissions
DeviceManagementServiceConfig.Read.All
DeviceManagementServiceConfig.ReadWrite.All- Grant admin consent for your organization
- In the menu click on Certificates & Secrets
- Click on + New Client secret
- Set a description and the expiry of the secret and click on Add
- Copy the value of the secret, this is required in part 3
- Go to the overview page and copy the Client ID and Tenant ID, those are also required in part 3
Part 2 – Create Microsoft List
- Open portal.office.com
- Click on the menu button
- Click on SharePoint (if you are missing the SharePoint button click on all apps)
- Open an existing SharePoint Site (if you do not have a site, create a site via the creating site button)
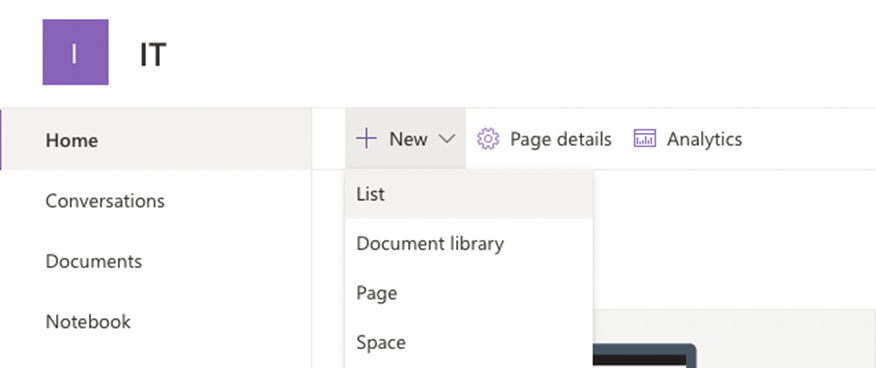
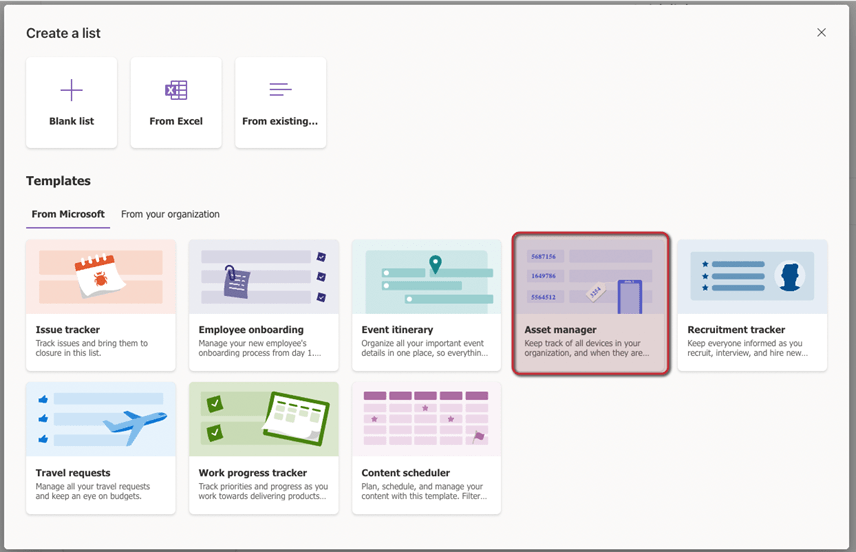
- Click on + new button
- Open the Asset Manager Template
- Click on the Use Template button
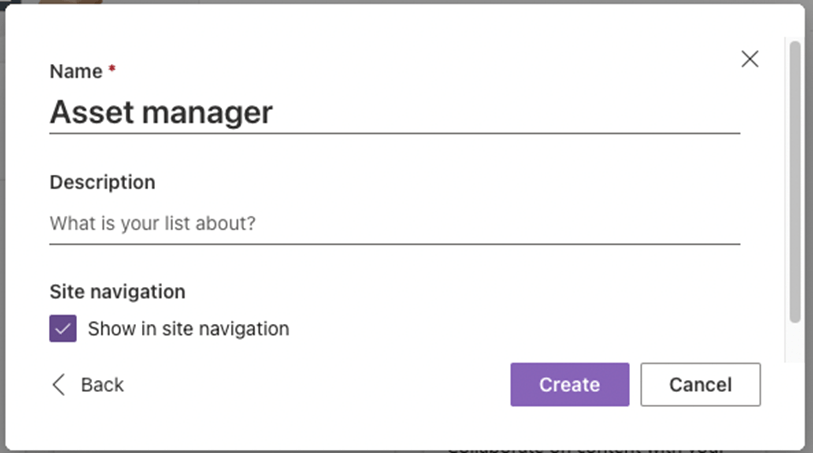
- Fill in a name and a Description for the Microsoft list.
- Click on Create and your new Microsoft List is created.
- Scroll to the last column and click on the + Add column.
(If you want to hide columns click on Show/hide columns) - Click on Single line of text
- Create the following columns
| Name | AutoPilot ID |
| Description | |
| Type | Single line of text |
| Default Value |
| Name | GroupTag |
| Description | |
| Type | Single line of text |
| Default Value |
Part 3 – Create Azure Logic App
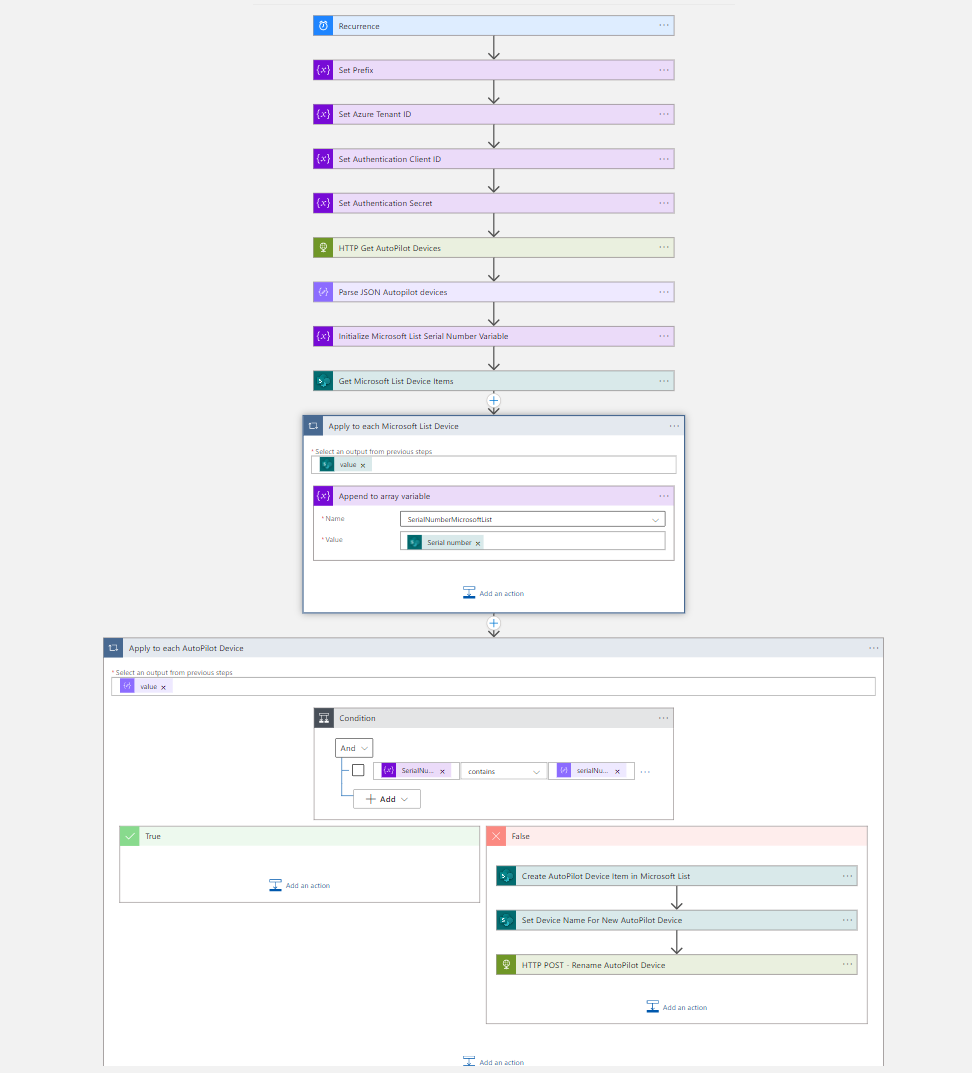
Note. Rename every Azure Logic App action to match the screenshots!
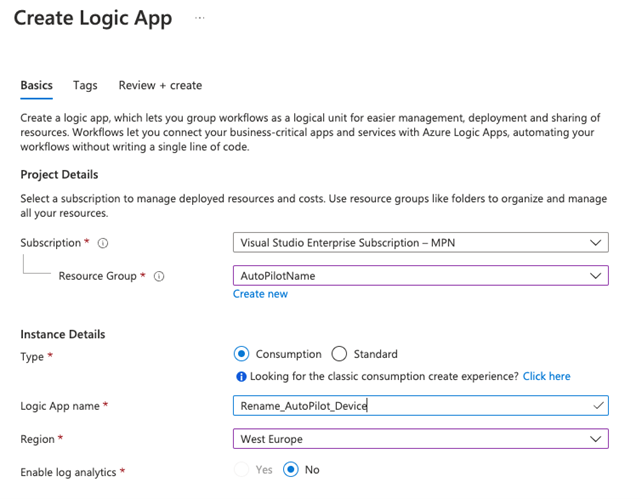
- Open portal.azure.com
- Search for Logic App
- Click on + Add
- Select an existing Resource Group or create a new Resource Group
- Select the instance Type (I have chosen for Consumption because it is cheaper to use and it’s only one flow. See Azure Calculator)
- Select your region and click on Review + Create
- Check the details on the Review + Create page and click on Create
- After the deployment is completed, go to your new Logic App via Go to Resource button
- The first step of the workflow is the Recurrence trigger, based on the desired interval
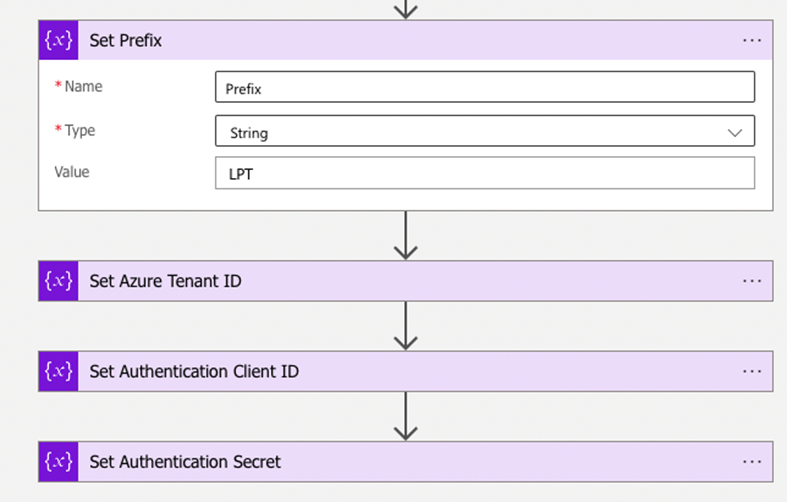
- The next four steps of the workflow are to initialize variables.
| Set Prefix | Set Azure Tenant ID | Set Authentication Client ID | Set Authentication Secret | |
|---|---|---|---|---|
| Name | Prefix | TenantID | ClientID | Secret |
| Type | String | String | String | String |
| Value | E.G., LPT | {Paste the Tenant ID that you have copied in part 1} | {Paste the Client ID that you have copied in part 1} | {Paste the secret that you have copied in part 1} |
- The next step is to get all AutoPilot devices via a HTTP Get request
| Method | Get |
| Authentication Type | Active Directory OAuth |
| Tenant | @{variables(‘TenantID’)} |
| Audience | https://graph.microsoft.com |
| Client ID | @{variables(‘ClientID’)} |
| Credential Type | Secret |
| Secret | @{variables(‘Secret’)} |
URI:
https://graph.microsoft.com/beta/deviceManagement/windowsAutopilotDeviceIdentities/- Now we must parse the returned Autopilot devices info into separate outputs via Parse JSON function
Content: @{body(‘HTTP_Get_AutoPilot_Devices’)}
Schema:
{
    "type": "object",
    "properties": {
        "@@odata.context": {
            "type": "string"
        },
        "@@odata.count": {
            "type": "integer"
        },
        "value": {
            "type": "array",
            "items": {
                "type": "object",
                "properties": {
                    "id": {
                        "type": "string"
                    },
                    "deploymentProfileAssignmentStatus": {
                        "type": "string"
                    },
                    "deploymentProfileAssignmentDetailedStatus": {
                        "type": "string"
                    },
                    "deploymentProfileAssignedDateTime": {
                        "type": "string"
                    },
                    "groupTag": {
                        "type": "string"
                    },
                    "purchaseOrderIdentifier": {
                        "type": "string"
                    },
                    "serialNumber": {
                        "type": "string"
                    },
                    "productKey": {
                        "type": "string"
                    },
                    "manufacturer": {
                        "type": "string"
                    },
                    "model": {
                        "type": "string"
                    },
                    "enrollmentState": {
                        "type": "string"
                    },
                    "lastContactedDateTime": {
                        "type": "string"
                    },
                    "addressableUserName": {
                        "type": "string"
                    },
                    "userPrincipalName": {
                        "type": "string"
                    },
                    "resourceName": {
                        "type": "string"
                    },
                    "skuNumber": {
                        "type": "string"
                    },
                    "systemFamily": {
                        "type": "string"
                    },
                    "azureActiveDirectoryDeviceId": {
                        "type": "string"
                    },
                    "azureAdDeviceId": {
                        "type": "string"
                    },
                    "managedDeviceId": {
                        "type": "string"
                    },
                    "displayName": {
                        "type": "string"
                    }
                },
                "required": [
                    "id",
                    "deploymentProfileAssignmentStatus",
                    "deploymentProfileAssignmentDetailedStatus",
                    "deploymentProfileAssignedDateTime",
                    "groupTag",
                    "purchaseOrderIdentifier",
                    "serialNumber",
                    "productKey",
                    "manufacturer",
                    "model",
                    "enrollmentState",
                    "lastContactedDateTime",
                    "addressableUserName",
                    "userPrincipalName",
                    "resourceName",
                    "skuNumber",
                    "systemFamily",
                    "azureActiveDirectoryDeviceId",
                    "azureAdDeviceId",
                    "managedDeviceId",
                    "displayName"
                ]
            }
        }
    }
}- The next step is to create an array variable via Initialize variable operation
| Initialize Microsoft List Serial Number Variable | |
|---|---|
| Name | SerialNumberMicrosoftList |
| Type | Array |
- The next step is to get the Microsoft List items via Get items.
- Click on the Sign in button and login with an account that has read/write access to the Microsoft List you had created in Part 1.
I have selected my admin account - Select the SharePoint List Site Address and the Microsoft List you have created in Part 1
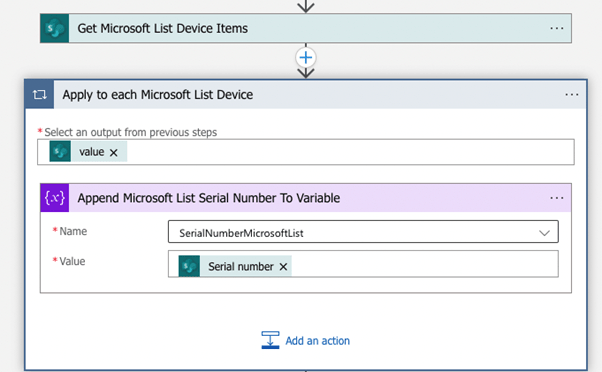
- Create again a For each loop and select the value output of the Get Microsoft List Device Items
- Now it is time to fill the last array variable SerialNumberMicrosoftList with the Serial number value of the Microsoft List via an Append to array variable
- Time to do some magic and compare both data sources.
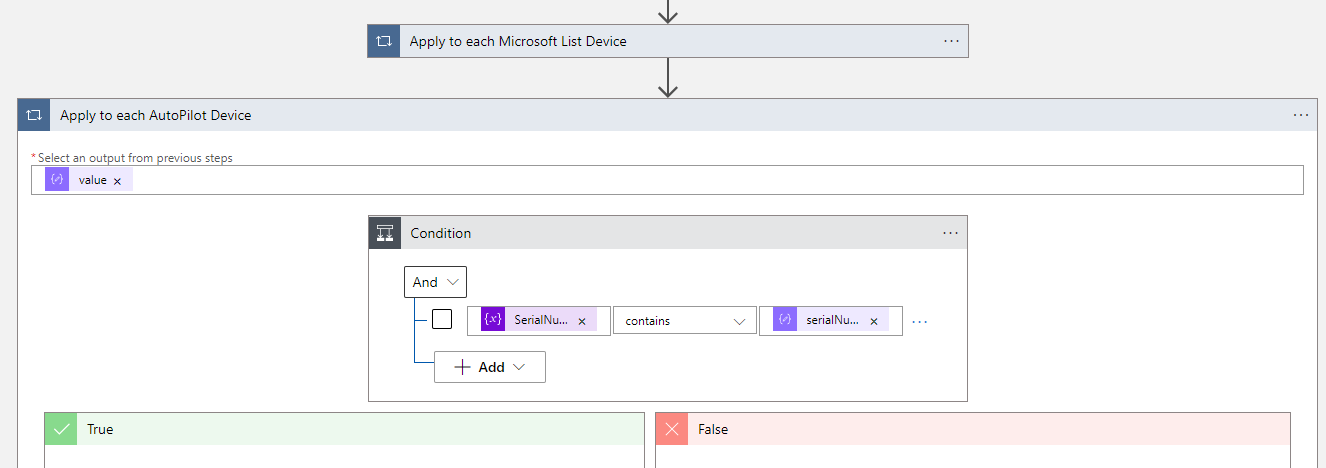
- Create a new step with a For each action, and select the value of the Parse JSON Autopilot devices action
- Add the Condition action to the Apply to each AutoPilot Serial Number Variable loop.
- Set the condition: variable SerialNumberMicrosoftList contains serialNumber
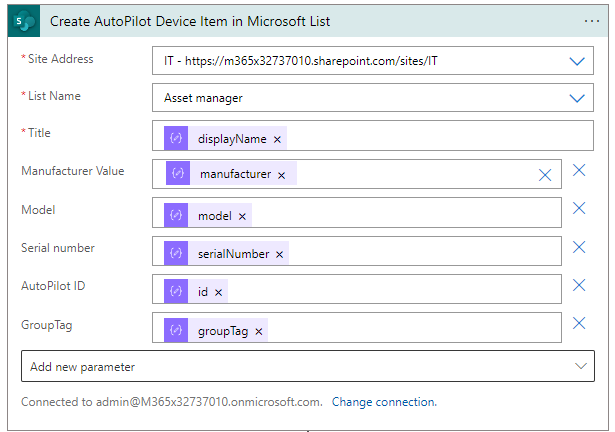
- Add Create Item action in the False part of the condition
- Select the correct SharePoint Site Address and list name
- Click on Add new parameter button and add the following parameters:
-
- Manufacturer Value
- Model
- Serial Number
- AutoPilot ID
- GroupTag
- Set per parameter the following dynamic Apply to each AutoPilot Device content:
Title:
@{items('Apply_to_each_AutoPilot_Device')?['displayName']}

Manufacturer:
@items('Apply_to_each_AutoPilot_Device')?['manufacturer']

Model:
@{items('Apply_to_each_AutoPilot_Device')?['model']}

Serial number:
@{items('Apply_to_each_AutoPilot_Device')?['serialNumber']}

AutoPilot ID:
@{items('Apply_to_each_AutoPilot_Device')?['id']}

Grouptag:
@{items('Apply_to_each_AutoPilot_Device')?['groupTag']}- Now it is time to set the correct name for the AutoPilot device based on the SharePoint List ID. Create an Update item
- Select the same Site Address and List name.
- Configure the ID property of the Create AutoPilot Device Item in Microsoft List action:
@{body('Create_AutoPilot_Device_Item_In_Microsoft_List')?['ID']}- Configure the Title with:
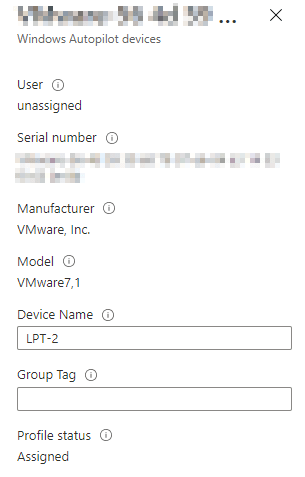
@{variables('Prefix')}@{body('Create_AutoPilot_Device_Item_In_Microsoft_List')?['ID']}- The name is set correctly within Microsoft List and will be increased by one if a new device is added.
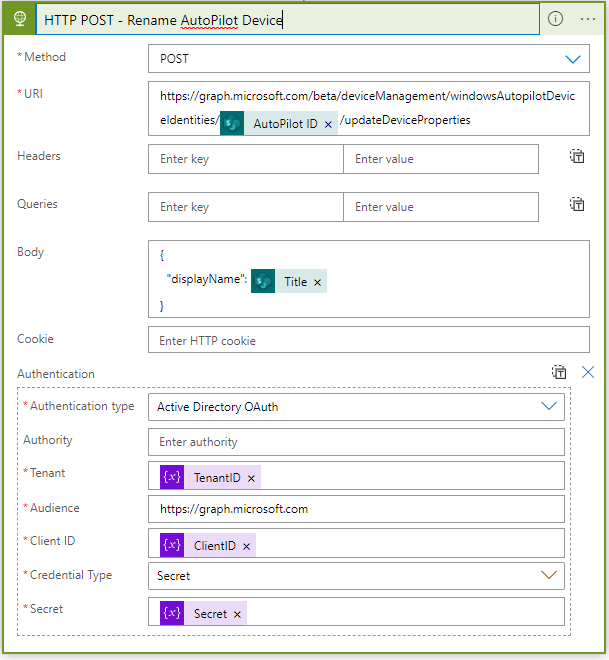
- Let’s synchronize the Microsoft List with AutoPilot. Create a new HTTP action with following settings
| Method | POST |
| Body | { “displayName”: @{body(‘Set_Device_Name_For_New_AutoPilot_Device’)[‘Title’]} } |
| Authentication Type | Active Directory OAuth |
| Tenant | @{variables(‘TenantID’)} |
| Audience | https://graph.microsoft.com |
| Client ID | @{variables(‘ClientID’)} |
| Credential Type | Secret |
| Secret | @{variables(‘Secret’)} |
URI:
https://graph.microsoft.com/beta/deviceManagement/windowsAutopilotDeviceIdentities/@{body('Set_Device_Name_For_New_AutoPilot_Device')?['AutoPilotID']}/updateDeviceProperties- Save the Logic App and Click on Run Trigger














This is really helpful, thanks for taking the time to put together.
A couple of questions
1. Would it work ok with Autopilot Hybrid join? – would the new device name be written back to AD
2. Any impacts by triggering this as part of Intune join, or should it be run after the devices have been joined – i.e will it create duplicate devices in Intune
Hi Malcolm,
Hybrid join does not work, because the device name needs to be defined in the policy name and not in autopilot.
Hi René. Excellent blog post! I’ve already implemented the solution in my environment. Thank you so much for sharing this!
I’ve tried to enhance the solution to include renaming Intune devices as well but unfortunately with no success as it seems I’m both very inexperienced with Logic Apps and API calls as a whole. I read your reply to Chris on 03/12/2022 and tried to work my way from there. The way I understand it, I need to have an additional column in the list e.g. ‘Intune ID’ as the Intune id and autopilot id are different and thus I can’t use the autopilot id to look up the device in Intune. Is this correct?
Also I tried in Microsoft Graph Explorer to manually edit the the device name of a test device in Intune by using POST https://graph.microsoft.com/beta/deviceManagement/managedDevices/{3bd92234-15ca-4c3a-be1a-78bc55cc916f}/ but the updateDeviceProperties doesn’t seem to exist here, so maybe I’ve completely lost track here?
In my perfect world, this guide would be updated to include Intune as well :-), but of course, any hints or further guidance would be very much appreciated. In any case thank you so much for this post! Even though I haven’t succeeded yet, I’ve already still learned a lot from this.
Kind regards
Christian
Is it possible to get into higher numbers, 5 or 6 digits?
Is there logic to tie the computer to a location and apply a naming scheme like XYZ-#####?
Hi Jason,
Yes it is possible, you can set the naming convention to 5 or 6 digests with the Formatnumber expression. So set the following code in the Title field of the Set Device Name For New AutoPilot Device action
@{variables(‘Prefix’)}@{formatNumber(body(‘Create_AutoPilot_Device_Item_In_Microsoft_List’)?[‘ID’],’000000′,’en-us’)}
Now you will get for example LPT-000001 or LPT-564895
Kind regards,
Rene
René,
Fantastic blog. Thank you for sharing you work with the world. I had some missteps along the way but I’m really close to having the logic app work.
Getting an error at “Apply to each Microsoft List Device.
ActionFailed. An action failed. No dependent actions succeeded.
BadRequest. The value cannot be null. The action type ‘AppendToArrayVariable’ only supports values of types ‘Float, Integer, String, Boolean, Object’.
Error:
https://prnt.sc/7lrQ8u-XQiJz
Screen shot of workflow
https://prnt.sc/KbAtUz5jIg7q
We have AutoPilot devices in out tenant and my MS was blank. I think the issue is around or in the Apply to each Microsoft List Device the value.I changed it to variablesSerialNumber(‘SerialNumberMicrosoftList’).It populated my Asset Manager List. Manufacturer,and GroupTag didn’t populate but those aren’t important. The last run stated “ActionFailed. An action failed. No dependent actions succeeded.” All my current devices are in numeric order. I’m hoping it will work on the next device.
I won’t know till Tuesday if it worked when I enroll a new device.
Thanks again.
René,
My numbers are sequential but some devices are no longer in the tenant list (retired/dead). If my format is LPT### and 000 – 007 are missing and 010-024 as well etc. Will it recognize LPT167 as the last in the series? So when the new laptop is turned on and AutoPilot does it’s thing, the Logic app set to run every 3 minutes will recognize DESKTOP-5A1V5E3 and rename it to LPT168?
Thanks.
Hi Chris, the logic app will use the Microsoft List ID. So, if a device is deleted or retired and removed from the Microsoft list it will continue to increase the ID. So, if the MS list ID is 167, the next device will be LPT168.
If you delete the object 095 to 110. The logic app will not start at 095.
After a device is registered in Autopilot (not enrollment started) it will be renamed in Autopilot after the run of the logic app.
Kind regards,
Rene
Hi Chris,
The action “append to array variable” in the for Apply to each Microsoft List Device loop should be @{items(‘Apply_to_each_Microsoft_List_Device’)?[‘SerialNumber’]} as described in my blogpost.
Can you tell me how you configure the condition in the Apply to each Intune Managed Device loop? this should be the following:
@variables(‘SerialNumberMicrosoftList’) Contains @items(‘Apply_to_each_Intune_Managed_Device’)?[‘serialNumber’]
in the false part of the condition, you need to create a SharePoint create item action with the following settings:
Title: @{items(‘Apply_to_each_Intune_Managed_Device’)?[‘displayName’]}
Manufacture value: @items(‘Apply_to_each_Intune_Managed_Device’)?[‘manufacturer’]
Model: @{items(‘Apply_to_each_Intune_Managed_Device’)?[‘model’]}
Serial number: @{items(‘Apply_to_each_Intune_Managed_Device’)?[‘serialNumber’]}
In this action the serial number is the most important value because that will be used the next run in the Append to array variable action.
If you don’t get the right information, can you please share your HTTP action?
Kind regards,
Rene
Great blog you have here! Can I check with you does this support Hybrid azure ad joined devices?
Hi Maccoy,
First, my advice is switch to AAD joined device. With the right setup you can reach your onprem resources. but I don’t know your configuration. But most of the time it is possible.
Let’s go to the answer of your question.
Hybrid AD Joined is using another method to enroll, it is not using the AutoPilot profile but a device configuration profile. so this means it is not possible via that way.
But their are other ways to fix your problem, If all your device are listed in MS list, you are able to built a flow that renames the device to the name in SP List.
If needed I can spend some time to figure it out and write a blog post about it. please let me know.
Kind regards,
Rene
Hi Rene,
I understand that most SCCM/Intune professionals also recommends moving to AAD only, however our company still pushing the hybrid azure ad joined. I’m actually also thinking of putting the device details in MS list and assigning a name on the MS list as well then was thinking if Azure logic apps can actually assist in applying the device name to the client. Sure if you can have some time to test it out and write a blog about it. I would be happy to assist too in any way to test it out.
Kind regards,
Maccoy
Hi Rene,
Sure, if you have the time to figure it out and post it as a blog that would really be great. Really appreciate your time in helping out.
Kind regards,
Maccoy
Hi Rene, great blog you have here. May I know if it is possible to input the names and serial numbers in the sharepoint list and ask the logic apps to use the names provided in the list. Because our current inventory we are assigning name tags to the devices manually.
Hello, René
Thank you from me also for posting the instructions.
But I would like to see the code also.
It’s my very first and I’m having a problem with “Check if AutoPilot Serial Number Exist In Microsoft List”
I think that the problem is over there because it’s always False and I have the same device with different names in Asset Manager.
And can you tell me how to write the prefix if I want the devices be named like this:
Device-001
Device-002
…
Device-010
Device-011
…
Device-100
Device-101
…
Device-112
…
Hi,
to get the naming convention with 3 numbers like 101 you could use the Formatnumber expression. So set the following code in the Title field of the Set Device Name For New AutoPilot Device action
@{variables('Prefix')}@{formatNumber(body('Create_AutoPilot_Device_Item_In_Microsoft_List')?['ID'],'000','en-us')}Did you set the @variables(‘SerialNumberAutoPilotDevice’) as the input for the Apply to each AutoPilot Serial Number Variable loop and set the condition to @variables(‘SerialNumberMicrosoftList’) contains @items(‘Apply_to_each_AutoPilot_Serial_Number_Variable’) = [current item].
If the condition is always false, can you create before the condition a compose action with both variables to check if both are filled with data?
To be sure you don’t have any item listed in your Ms list? and you have an AutoPilot device in your tenant registered?
Kind regards,
Rene
Hi.
Your Instructions state.
” Create a For each action with the Value output of the Parse JSON AutoPilot Devices step
Next step is to fill two variables. Create two append to array variable actions in the for each loop.
Name AutoPilot ID Value @{items(‘Apply_to_each_AutoPilot_Device’)?[‘serialNumber’]}
The Array does Not allow selection of AutoPilot ID Value. Dropdown list is only the three previous steps ( SerialNumberMicrosoftList, AutoPilotDeviceInfo, & SerialNumberAutoPilotDevice )
Please help.
Richard
Hi Richard,
I am sorry, I changed some actions in my flow and I didn’t update that one. You should use SerialNumberAutoPilotDevice. I have updated my blog and created my Logic app again. I will send you the code via the e-mail and a print screen of all the actions.
Kind regards,
Rene
can you also share the code via email to me?
Hi Victor,
sorry. I cannot send you the code, their is a SP connection in the flow and in the code, so you are not able to import.
Kind regards,
Rene
Sorry. Still not clear on the steps. Can you reach out to me via email ? I can send you the screen grabs of the steps where it is confusing Thanks so much for your help
Hi. Thanks for taking the effort to posting instructions. I got to the end of the parse json section and it returns the results. However the instructions aren’t that clear for the next steps. Are they out of order ? or could you please post more detailed instructions for each step ? Or a youtube video ? Please & thank you
Hi Richard,
Happy to help. Sorry that it was not clear enough. I had changed my flow and forget to update all the actions and images, now it up to date. Hopefully it is now more clear and you can forget the compose action that is not needed anymore.
Please let me know if you need any help.
Kind regards,
Rene