Create dynamic groups with an increasing number of users
The purpose of the blog post is to inform you how to create Azure AD dynamic populated groups that always contain an increasing number of users.
In my previous blog post, I explained how to create randomly populated groups that are approximately equally distributed with the number of users for my roll-out strategy for the update rings that I have explained in this blog post.
Requirements:
Graph API Requirements:
Azure AD groups
Azure Active Directory (Azure AD) lets you use groups to manage access to your cloud-based apps, on-premises apps, and your resources. For instance, Azure AD Security groups are being used in Intune to assign configuration policies and applications.
Within the Microsoft Cloud, you have multiple group types available, in this blog post I will highlight only Azure AD static groups and dynamic groups and you can use the Azure AD static groups.
Azure AD Dynamic groups
In Azure Active Directory (Azure AD), you can use rules to determine group membership based on user or device properties. Dynamic membership is supported for security groups and Microsoft 365 Groups.
When a group membership rule is applied, user and device attributes are evaluated for matches with the membership rule. When an attribute changes for a user or device, all dynamic group rules in the organization are processed for membership changes. Users and devices are added or removed when they meet the conditions for a group.
Members of a dynamic group can only be added via the dynamic rule syntax. You are not able to add users to the group and you are limited to the dynamic rule syntax options.
Note. Dynamic groups require an Azure AD Premium P1 license for each unique user that is a member of one or more dynamic groups.
More information about creating a dynamic group can be found here
Azure AD Static groups
In Azure Active Directory (Azure AD), Static groups are listed as assigned groups, and all members (users/devices) of this group are manually added or need to be removed manually from the group.
Azure AD assigned groups are comparable to traditional ad groups that also had to be adjusted manually. In contrast to the dynamic groups, you are not limited to the rule syntax rules. You can add for instance members to the group via the Graph API.
As I already mentioned, Dynamic groups are limited to the available rule syntaxes. I want to make 4 “dynamic” groups that are increasing the number of members. This is not an option in the dynamic rule syntax, so this must be an Azure AD static group.
Groups with an increasing number of users
For rolling out a new feature, new Intune configuration policies, or windows update, I want to roll it out in different waves to have the ability to halt the rollout if my policy or the update breaks my devices.
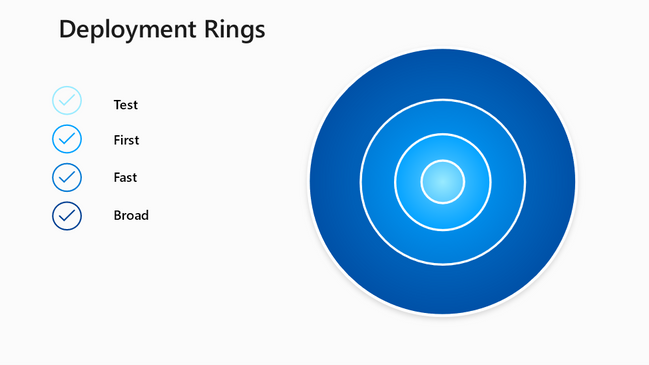
As already mentioned, I want to have 4 groups that I can use for rolling out.
Group 1 Test – 2 % of my total users
Group 2 First – 8 % of my total users
Group 3 Fast – 30 % of my total users
Group 4 Broad – 60 % of my total users
Azure Logic App
Azure Logic Apps is a cloud service that helps you schedule, automate, and orchestrate tasks, business processes, and workflows when you need to integrate apps, data, systems, and services across enterprises or organizations. The UI of Azure Logic apps is user-friendly, but you can create your logic app via code as well.
More information about Azure Logic apps can be found here
The Azure Logic app has two pricing options. A standard plan or pay-as-you-go model (consumption).
A consumption-based subscription is a good decision when you are using a limited number of workflows or runs. If you have many Logic apps, or if your app runs several times a day, it is worth considering the standard consumption-based model.
More information on pricing can be found here or you can use the azure calculator to see which option best suits your situation
Creating the Azure AD groups
- Open Microsoft endpoint manager
- Select Groups in the menu
- Under Groups, select All groups
- Click on New Group
Or use the following link New Group – Microsoft Endpoint Manager admin center - Set the following settings
| SETTING | VALUE |
|---|---|
| Group type | Security |
| Group Name | E.g. Patching group 1 |
| Group Description | Set a good description, so that everyone with access to the portal knows the purpose of the group |
| Azure AD roles can be assigned to the group | No |
| Membership type | Assigned |
- Click on create
- Repeat the above tasks to create in total the following four groups
| Name | Type |
|---|---|
| Patching group 1 | Assigned |
| Patching group 2 | Assigned |
| Patching group 3 | Assigned |
| Patching group 4 | Assigned |
Create App Registration
- Open azure.com
- Click on Azure Active Directory
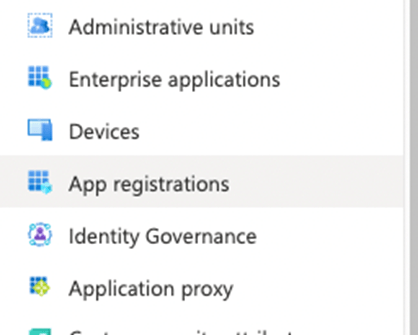
- Click on App Registrationin the left menu
Or use the following link Active Directory | App Registration
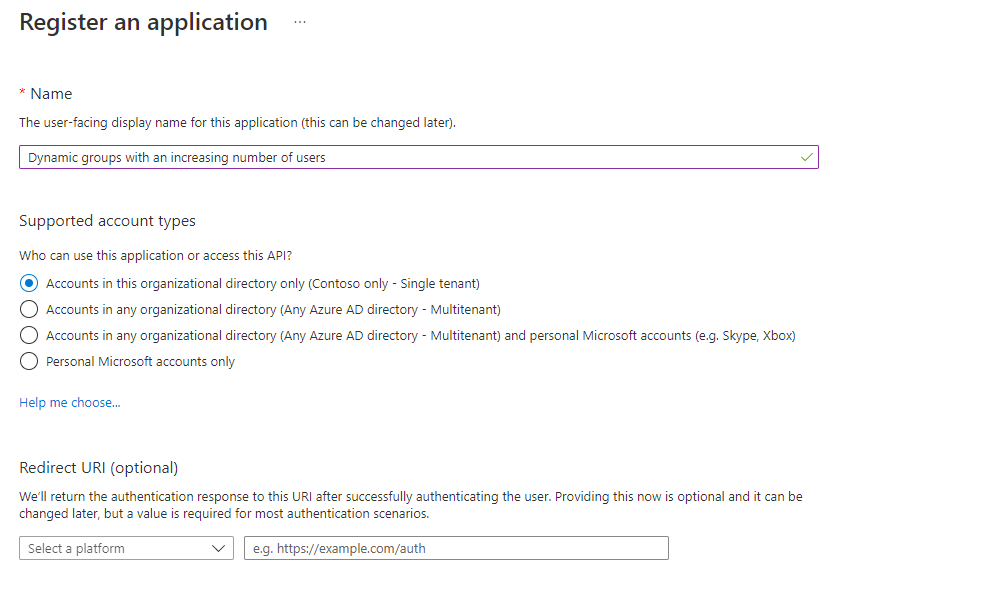
- Click on + New registration
- Configure an app name e.g., Dynamic groups with an increasing number of users
- Click on the Register button, the app will be created and automatically opened.
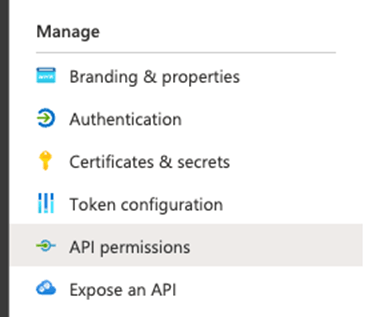
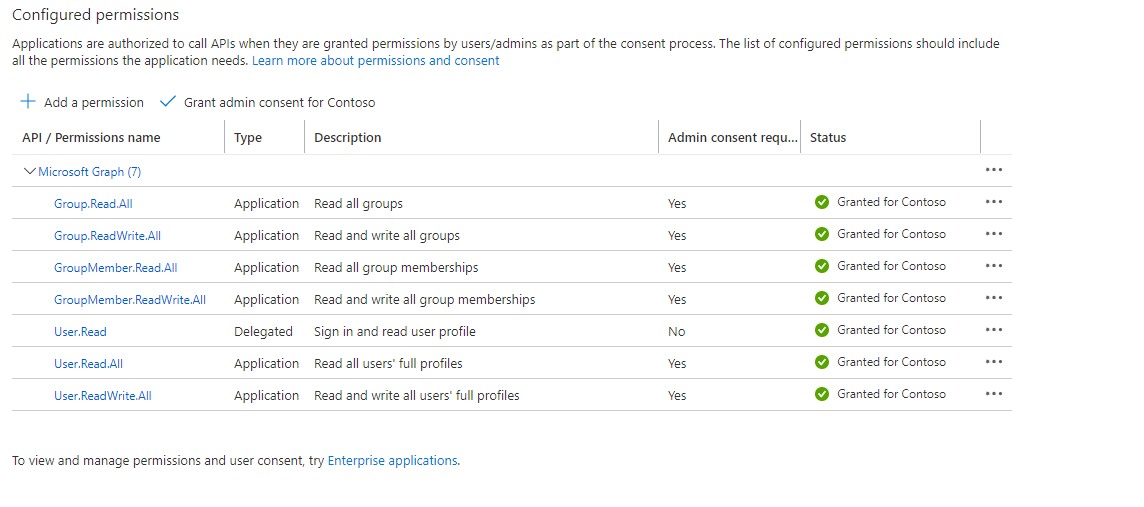
- In the menu click on API Permissions
- Click on + Add a permission
- Select Microsoft Graph and select Application permissions
- Search and add the following permissions
Group.Read.All
Group.ReadWrite.All
GroupMember.Read.All
GroupMember.ReadWrite.All
User.Read
User.Read.All
User.ReadWrite.All- Grant admin consent for your organization
- In the menu click on Certificates & Secrets
- Click on + New Client secret
- Set a description and the expiry of the secret and click on Add
- Copy the value of the secret, this is later in the blog post needed
- Go to the overview page and copy the Client ID and Tenant ID, those are also needed later in the blog post
Creating the Logic App
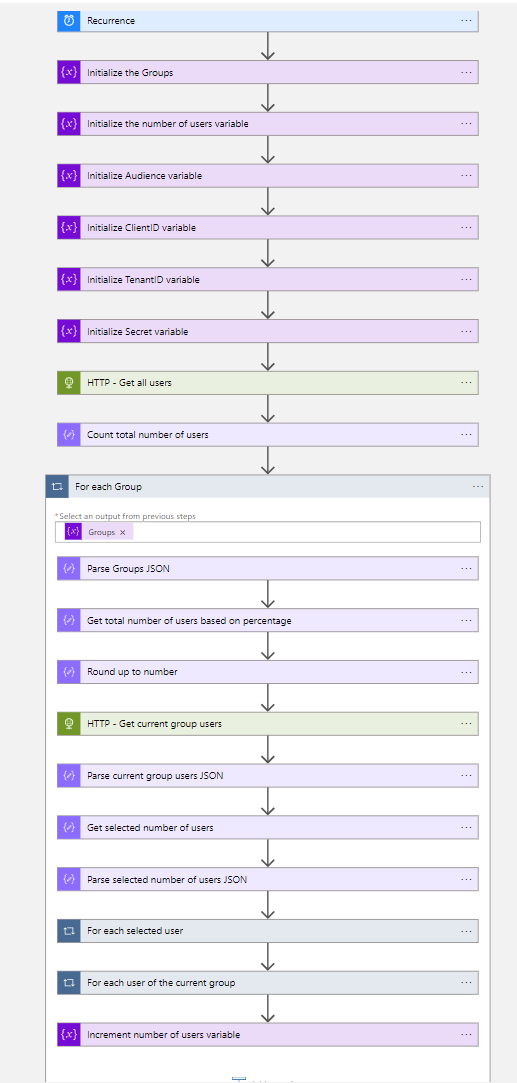
Note. Rename every Azure Logic App action to match the screenshots!
- Open portal.azure.com
- Search for Logic App
- Click on + Add
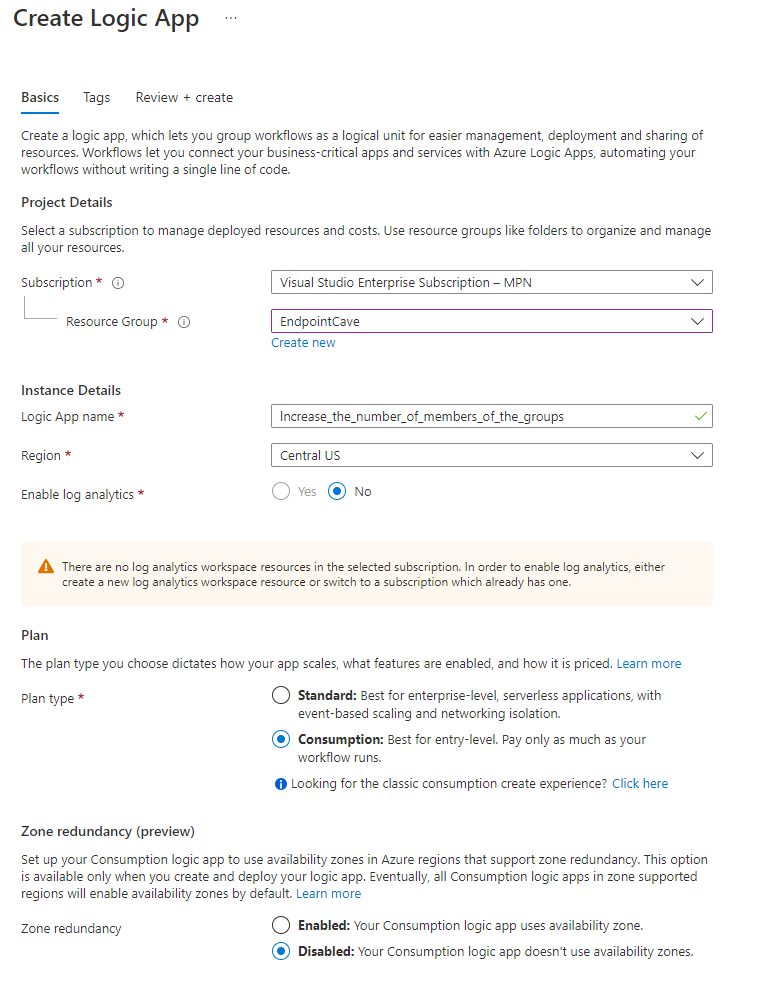
- Select an existing Resource Group or create a new Resource Group
- Select the instance Type (I have chosen Consumption-based, because it is cheaper to use, and it is only one flow. See Azure Calculator)
- Set a Logic App name under Instance Details
- Select your region
- click on Review + Create
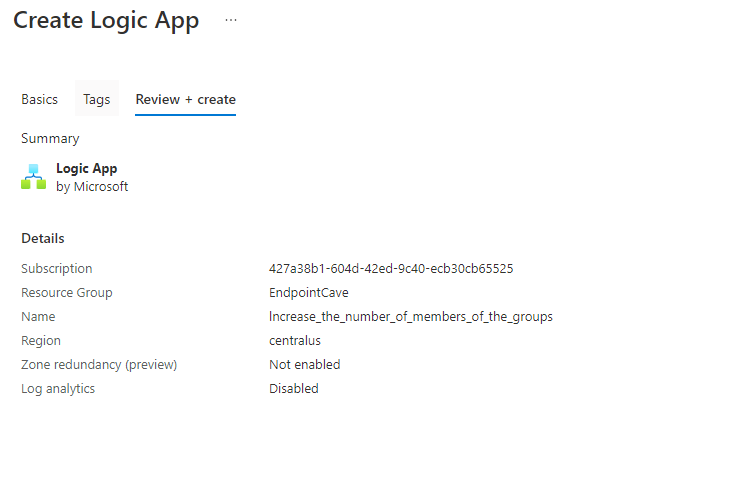
- Check the details on the Review + Create page and click on Create
- After the deployment is completed, go to your new Logic App via Go to Resource button
- Select Blank logic App under templates
- Now you must trigger the Azure Logic App, the trigger will be the Recurrence trigger, based on the desired interval
Note. I have used a daily interval in this blog.
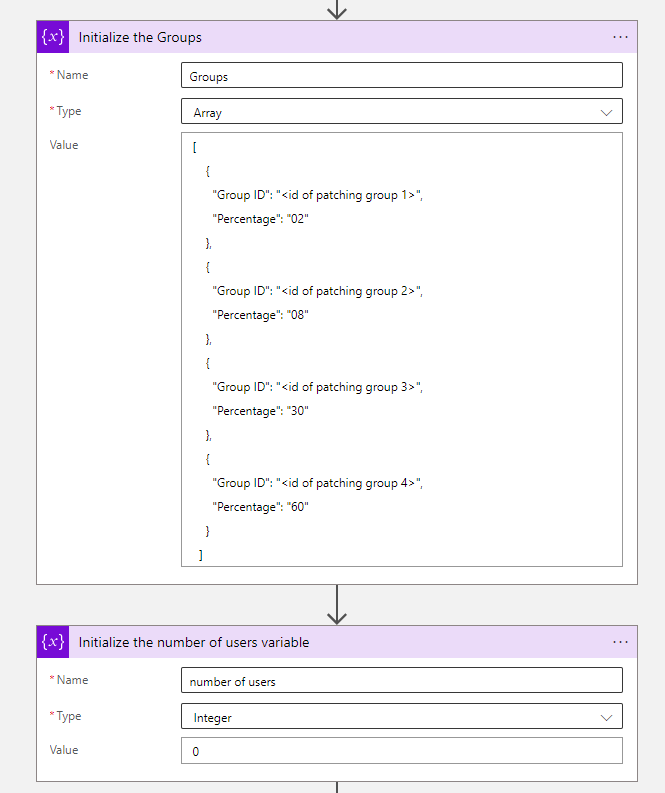
- The first step after the trigger will be two initialize variables actions, so you can Initialize the Groups and Initialize the number of users variable. Set for the Initialize the Groups action the below array and set the Initialize the number of users variable to interger 0.
[
    {
      "Group ID": "<id of patching group 1>",
      "Percentage": "02"
    },
    {
      "Group ID": "<id of patching group 2>",
      "Percentage": "08"
    },
    {
      "Group ID": "<id of patching group 3>",
      "Percentage": "30"
    },
    {
      "Group ID": "<id of patching group 4>",
      "Percentage": "60"
    }
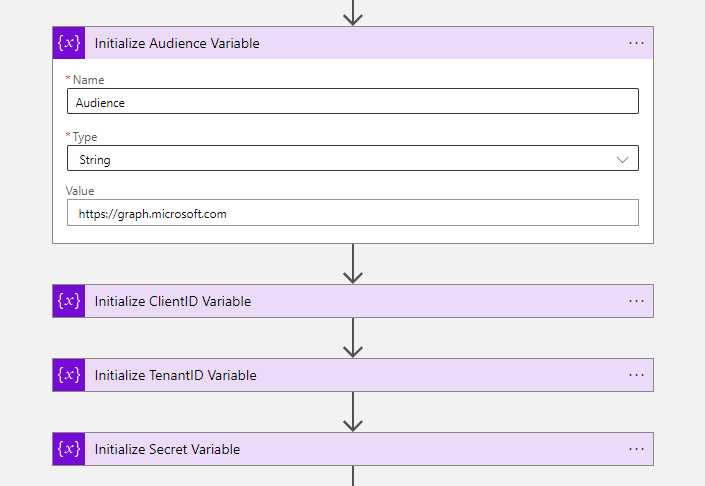
]- The next four steps are needed for the authentication of the HTTP actions and are initialize variables as well.
| INITIALIZE AUDIENCE VARIABLE | INITIALIZE TENANTID VARIABLE | INITIALIZE CLIENTID VARIABLE | INITIALIZE SECRET VARIABLE | |
| Name | Audience | ClientID | TenantID | Secret |
| Type | String | String | String | String |
| Value | https://graph.microsoft.com | {Paste your Tenant ID} | {Paste your Client ID} | {Paste your Secret} |
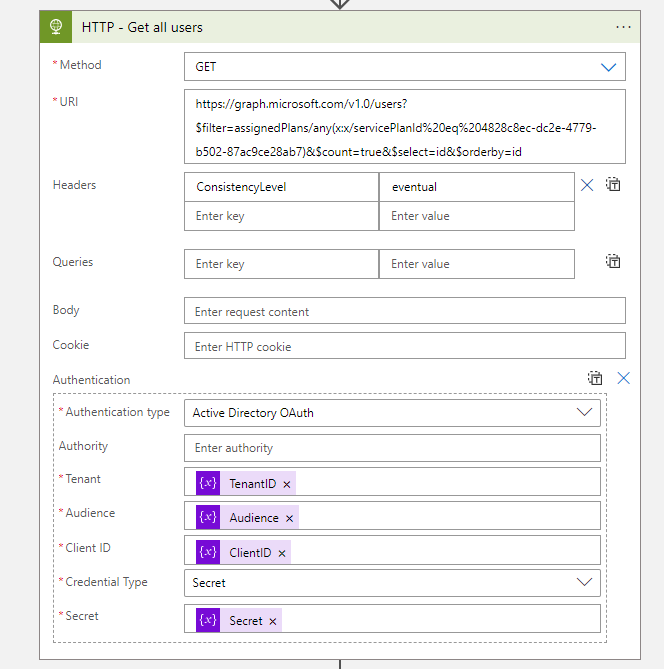
- After the Initialize Secret variable, You need to add an HTTP action to get all users.
| Method | Get |
| URI | https://graph.microsoft.com/v1.0/users?$filter=assignedPlans/any(x:x/servicePlanId%20eq%204828c8ec-dc2e-4779-b502-87ac9ce28ab7)&$count=true&$select=id&$orderby=id |
| Headers | ConsistencyLevel:eventual |
| Authentication Type | Active Directory OAuth |
| Tenant | @{variables(‘TenantID’)} |
| Audience | @{variables(‘Audience’)} |
| Client ID | @{variables(‘ClientID’)} |
| Credential Type | Secret |
| Secret | @{variables(‘Secret’)} |
Note. I was inspired by Thijs Lecomte who created a blog post about creating a dynamic group with all AAD premium licensed users. This method will exclude all your mailbox accounts and guest accounts etc. So, I have used the Graph API filter option, to get the same result.
Note. To get the needed results I had to add the ConsistencyLevel key to the HTTP header and add the $count=true to the http url. More information about that can be found here
- Back to the Flow, after the HTTP action, you need to add a compose action to count total number of users
length(body('HTTP_-_Get_all_users')?['value'])- Now you have the total number of users, which are distributed among the four groups. You need to create a for each action for the four groups, which are defined in the group variable array.
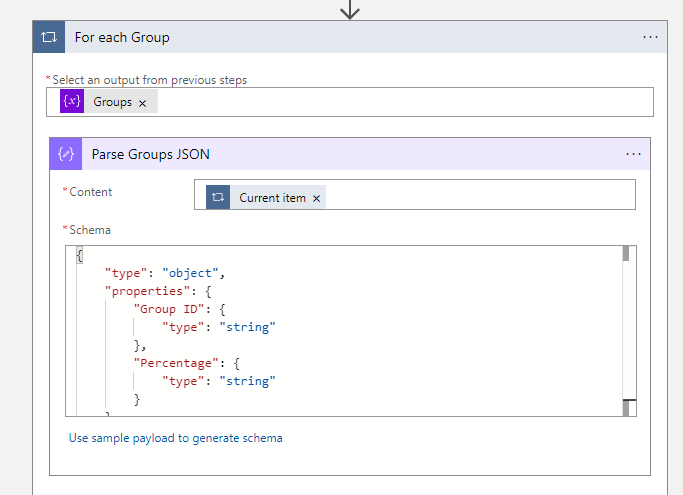
- The first action in the for each group action is parse the JSON. Select current item as input for the content field and use the following schema
{
    "properties": {
        "Group ID": {
            "type": "string"
        },
        "Percentage": {
            "type": "string"
        }
    },
    "type": "object"
}- The next step is to calculate the total number of users based on the percentage of the group. You need to add a compose action and enter the following expression.
mul(outputs('Count_total_number_of_users'),float(concat('0.',body('Parse_Groups_JSON')?['Percentage'])))- It can happen that the number of users is not round for example. 1.3, you need to round up the number. Add a new compose action and set the following expression.
if(less(length(split(string(mul(outputs('Count_total_number_of_users'),float(concat('0.',body('Parse_Groups_JSON')?['Percentage'])))),'.')),int(2)),int(first(split(string(mul(outputs('Count_total_number_of_users'),float(concat('0.',body('Parse_Groups_JSON')?['Percentage'])))),'.'))),if(less(int(last(split(string(mul(outputs('Count_total_number_of_users'),float(concat('0.',body('Parse_Groups_JSON')?['Percentage'])))),'.'))),int(1)),int(first(split(string(mul(outputs('Count_total_number_of_users'),float(concat('0.',body('Parse_Groups_JSON')?['Percentage'])))),'.'))),add(int(first(split(string(mul(outputs('Count_total_number_of_users'),float(concat('0.',body('Parse_Groups_JSON')?['Percentage'])))),'.'))),1)))Note. More information about rounding up the number you can read the this post on the Power Platform Community
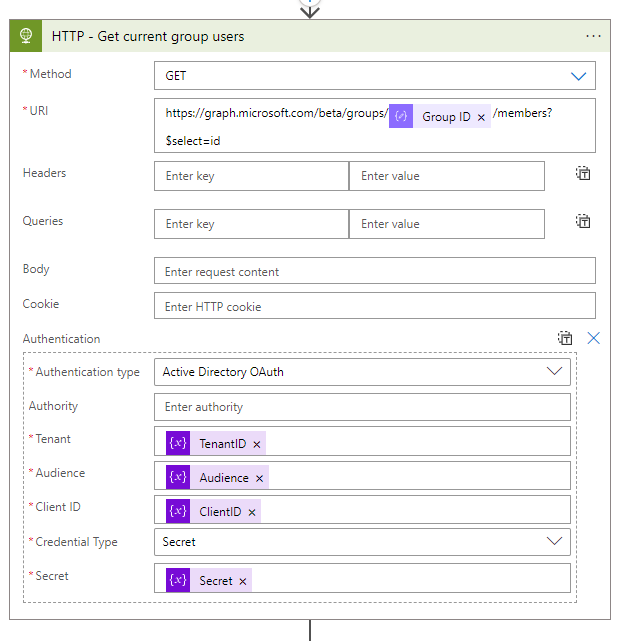
- After the round up to number compose action, you need to get all current users of the group via a HTTP action
| Method | Get |
| URI | https://graph.microsoft.com/beta/groups/@{body(‘Parse_Groups_JSON’)?[‘Group ID’]}/members?$select=id |
| Authentication Type | Active Directory OAuth |
| Tenant | @{variables(‘TenantID’)} |
| Audience | @{variables(‘Audience’)} |
| Client ID | @{variables(‘ClientID’)} |
| Credential Type | Secret |
| Secret | @{variables(‘Secret’)} |
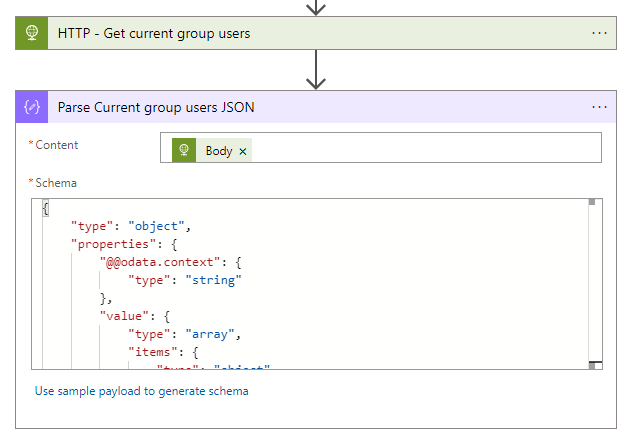
- After the HTTP action, you need to add a Parse JSON action with the body of the HTTP action as the content and the following schema
{
    "properties": {
        "@@odata.context": {
            "type": "string"
        },
        "value": {
            "items": {
                "properties": {
                    "@@odata.type": {
                        "type": "string"
                    },
                    "id": {
                        "type": "string"
                    }
                },
                "required": [
                    "@@odata.type",
                    "id"
                ],
                "type": "object"
            },
            "type": "array"
        }
    },
    "type": "object"
}- After the parse Current group users JSON, you need to add a Compose action to get the selected number of users based on the percentage and use the following expression
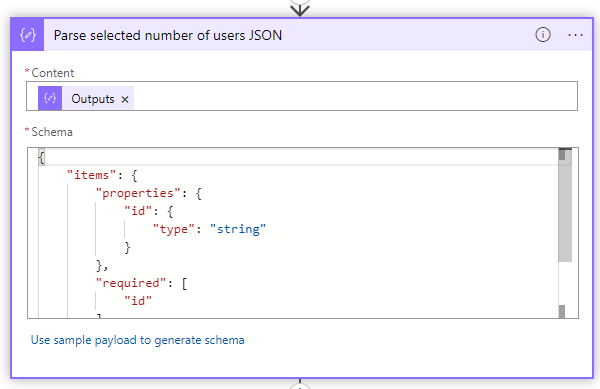
take(skip(body('HTTP_-_Get_all_users')?['value'],variables('number of users')),outputs('Round_up_to_number'))- The next step is to parse the output of the Get the selected number of users Create a parse JSON action and set the following schema
{
    "items": {
        "properties": {
            "id": {
                "type": "string"
            }
        },
        "required": [
            "id"
        ],
        "type": "object"
    },
    "type": "array"
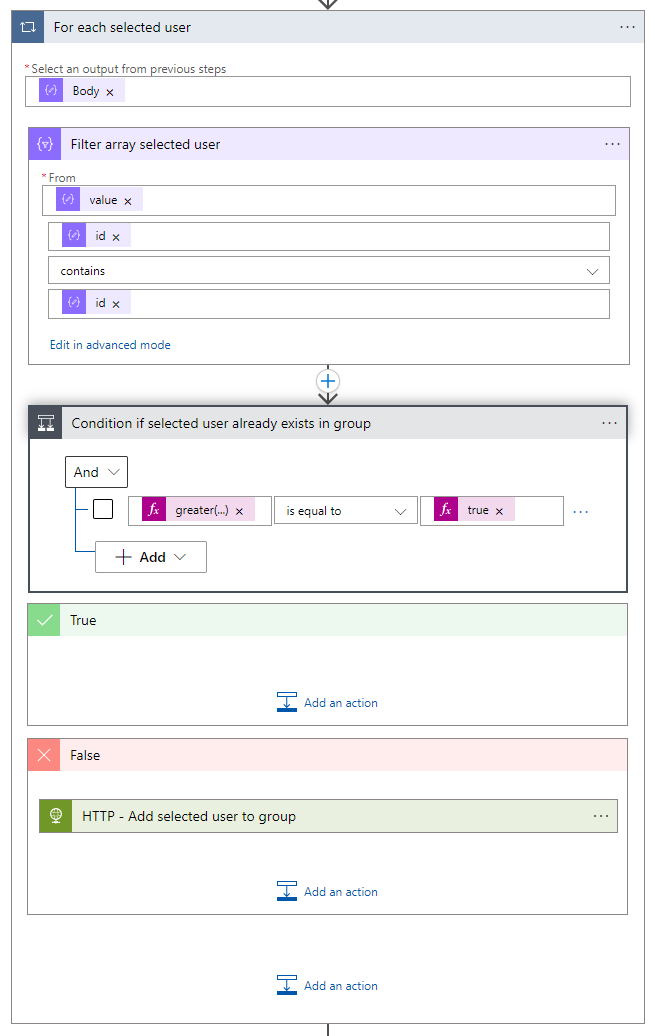
}- Now you have all the needed information, and it is time to populate the groups. Create a for each loop for each selected user. Selected the body of the parse selected number of users JSON.
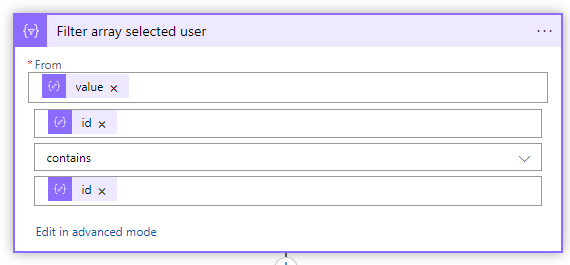
- Create a filter array action and set the following filter
| From: | @body(‘Parse_Current_group_users_JSON’)?[‘value’] |
| value | @item()?[‘id’] contains @items(‘For_each_selected_user’)[‘id’] |
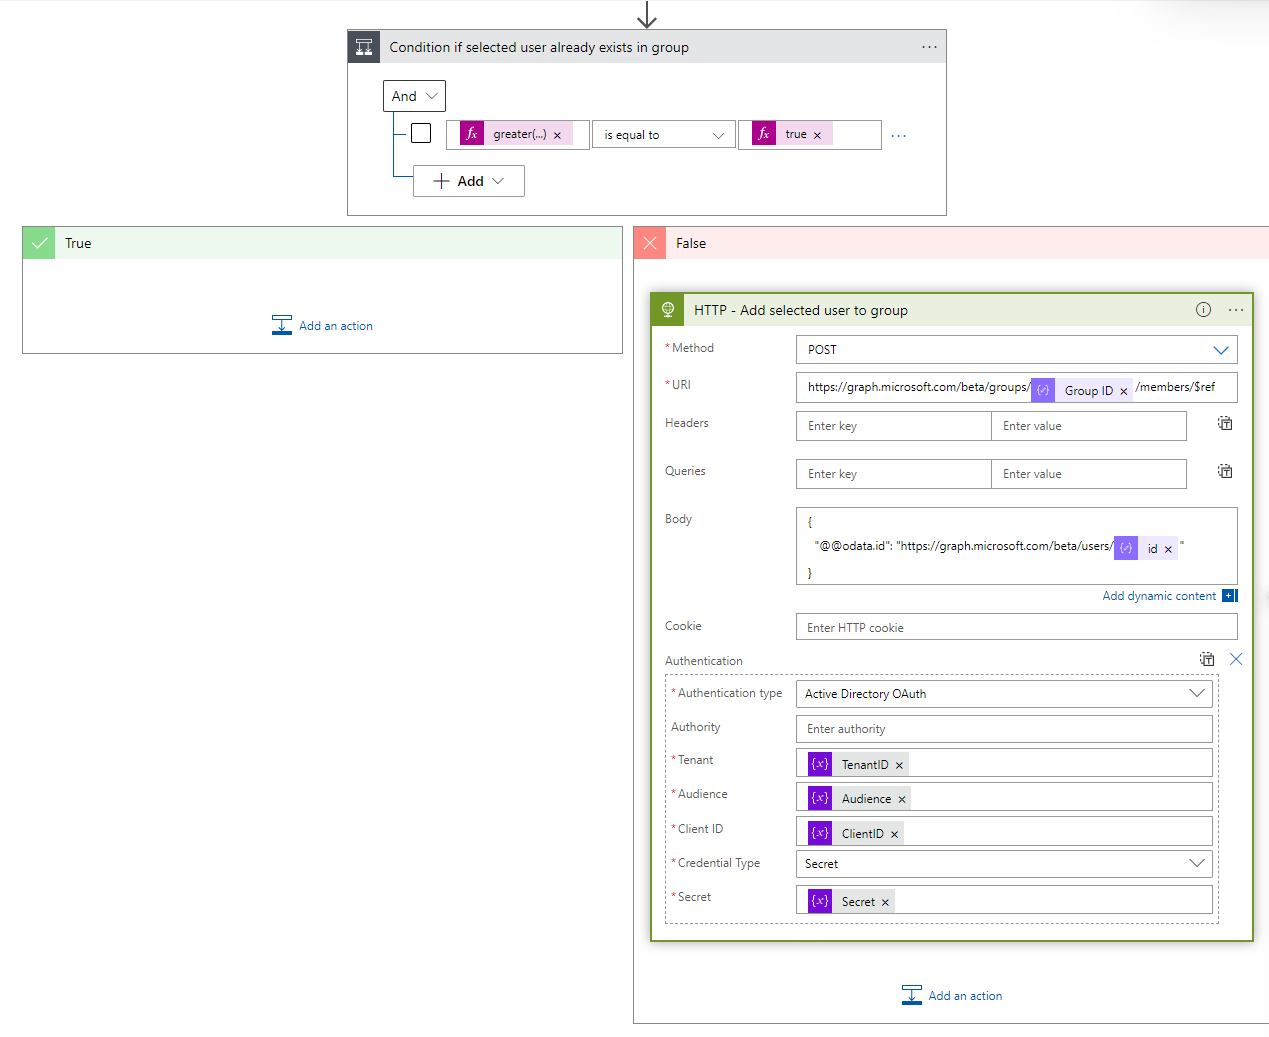
- After the filter array action, you must add a condition action to check if selected user already exists in group, set the following condition
| greater(length(body(‘Filter_array_selected_user’)),0) | is equal to | true |
- Add a HTTP action to the False section of the condition and set the following HTTP configuration.
| Method | POST |
| URI | https://graph.microsoft.com/beta/groups/@{body(‘Parse_Groups_JSON’)?[‘Group ID’]}/members/$ref |
| Body | { “@@odata.id”: “https://graph.microsoft.com/beta/users/@{items(‘For_each_selected_user’)[‘id’]}” } |
| Authentication Type | Active Directory OAuth |
| Tenant | @{variables(‘TenantID’)} |
| Audience | @{variables(‘Audience’)} |
| Client ID | @{variables(‘ClientID’)} |
| Credential Type | Secret |
| Secret | @{variables(‘Secret’)} |
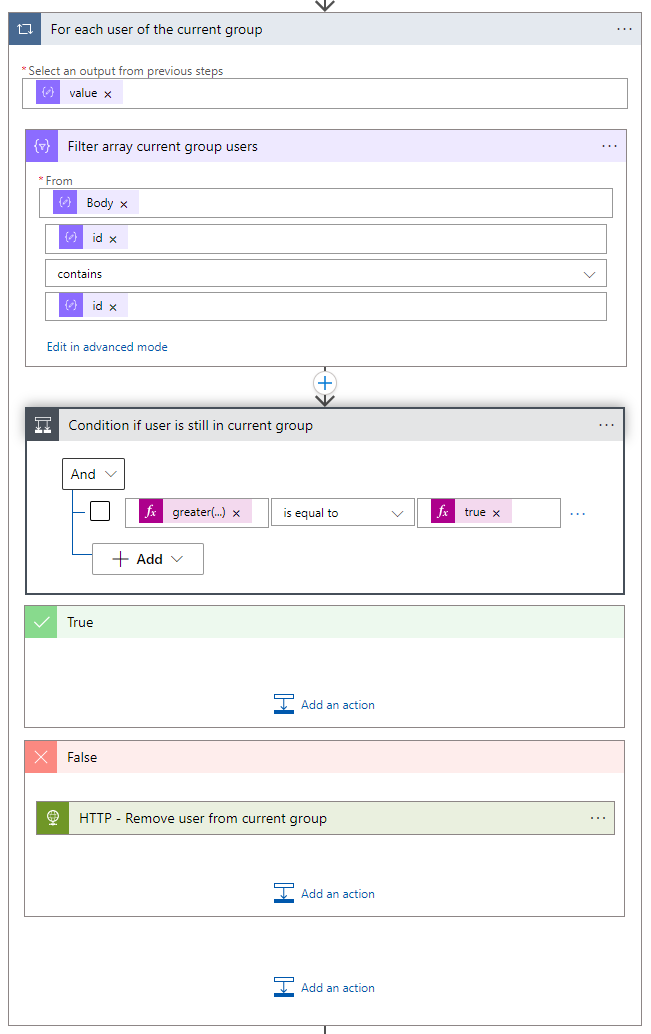
- Now you are done with the For each selected user loop and create another for each loop for each user of the current group. Use the value of the Parse Current group users JSON
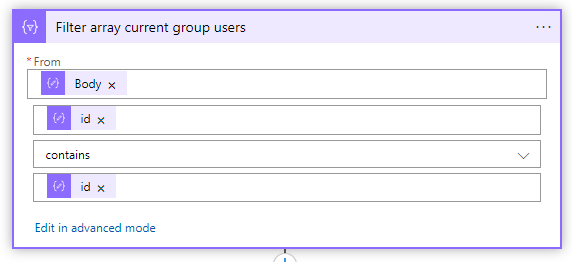
- Create in this for each loop a filter array action as well and set the following filter
| From: | @body(‘Parse_selected_number_of_users_JSON’) |
| value | @item()?[‘id’] contains @items(‘For_each_user_of_the_current_group’)?[‘id’] |
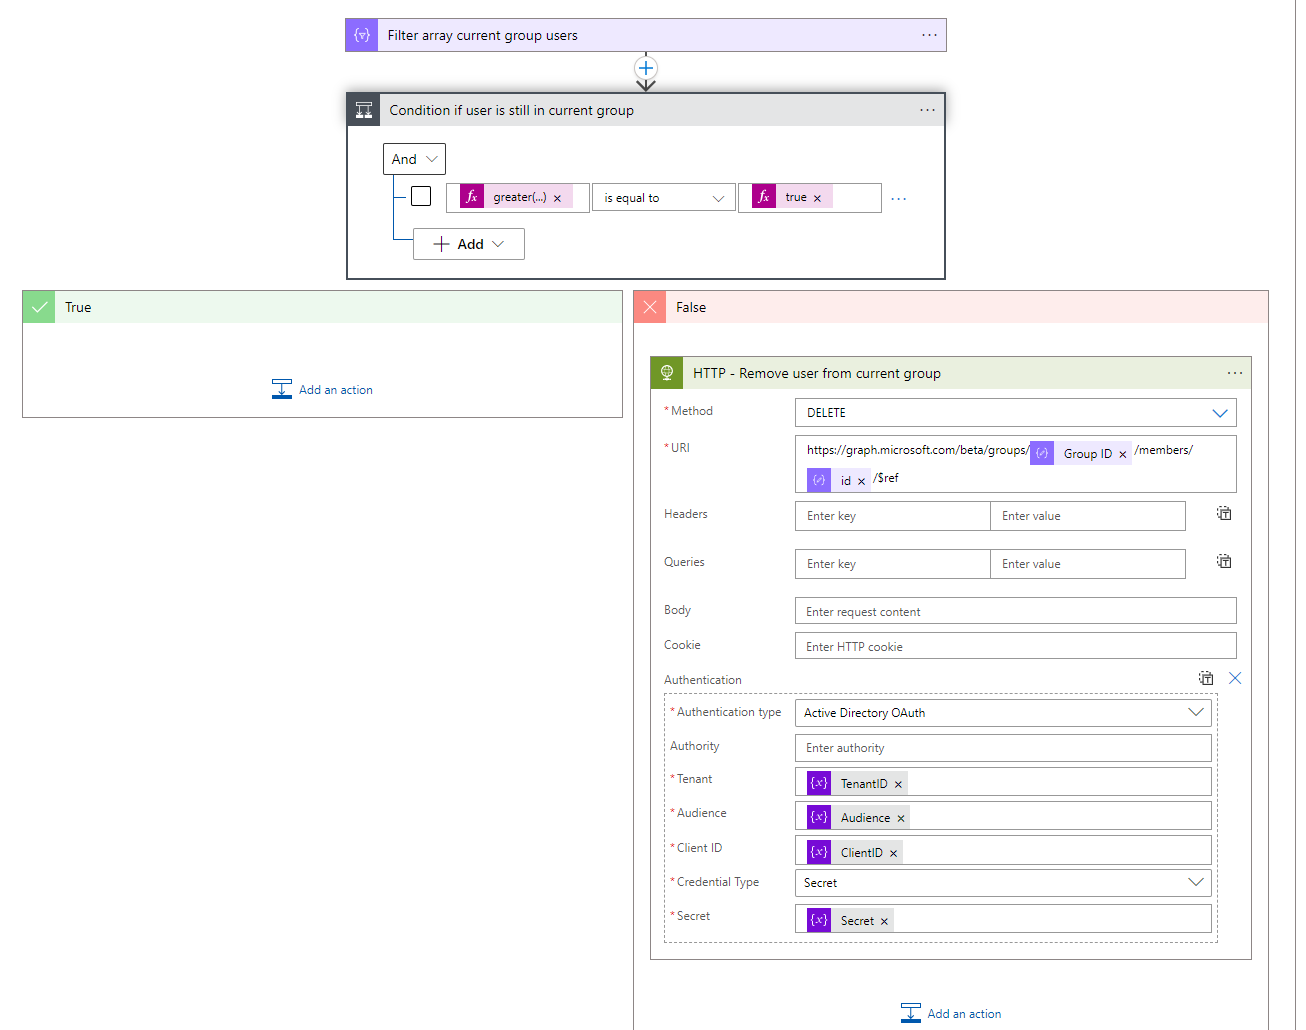
- After the filter array action, you must add a condition action to check if selected user already exists in group, set the following condition
| greater(length(body(‘Filter_array_current_group_users’)),0) | is equal to | true |
- Add a HTTP action to the False section of the condition and set the following HTTP configuration.
| Method | DELETE |
| URI | https://graph.microsoft.com/beta/groups/@{body(‘Parse_Groups_JSON’)?[‘Group ID’]}/members/@{items(‘For_each_user_of_the_current_group’)?[‘id’]}/$ref |
| Authentication Type | Active Directory OAuth |
| Tenant | @{variables(‘TenantID’)} |
| Audience | @{variables(‘Audience’)} |
| Client ID | @{variables(‘ClientID’)} |
| Credential Type | Secret |
| Secret | @{variables(‘Secret’)} |
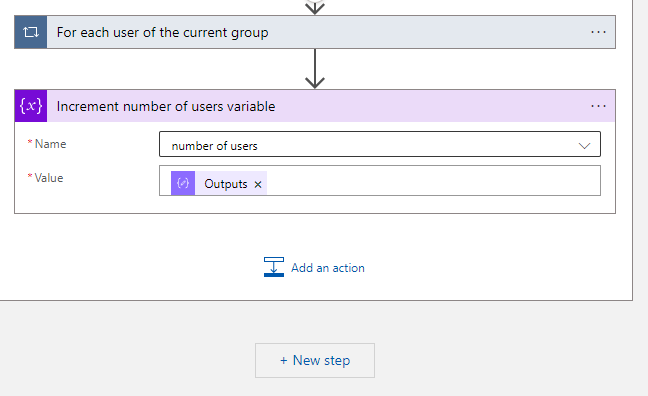
- Now the For each user of the current group loop is ready you have to add the last action in the For each Group loop, add the Increment variable action to increment the number of users variable.
- Select the Number of users variable in the name field and set as value the output of the Round up number action














Hi,
I’ve been trying to implement this for devices but run into an error at the ‘Parse selected number of devices JSON’ step.
The error:
InvalidJSON. The ‘content’ property of actions of type ‘ParseJson’ must be valid JSON. The provided value cannot be parsed: ‘Error parsing boolean value. Path ”, line 1, position 1.’.
Syntax: take(skip(body(‘HTTP_-_Get_all_Devices’)?[‘value’],variables(‘number of devices’)),outputs(‘Round_up_to_number’))
The ‘HTTP – Get all Devices’ step does appear to run and is collecting device details.
Appreciate any help or advice you can give.
Thanks
Farid
Hi Farid,
Did you rename all the steps correctly? Did you also check the quotes? sometimes if you copy the quotes they will be replaced with another symbol.
If you are using the following expression:
take(skip(body(‘HTTP_-_Get_all_devices’)?[‘value’],variables(‘number of users’)),outputs(‘Round_up_to_number’))
You must rename my action HTTP – Get all users to HTTP – Get all Devices
I hope this will fix your problems, if not please let me know
Hi Rene,
Thank you for responding.
I did check and can confirm all steps had been named for Device instead of User (especially HTTP – Get all Devices) and all expressions were changed to reference ‘Device’ as well. Still no luck.
I tried manually entering the full command but still no joy.
Thanks
Farid
What happens if you are using the same name as mentioned in my blog?
another solution edit the action click on the action option, select the body field of your HTTP action, copy the value of your action, and paste the value into your expression. Don’t forget to remove the @{ and }
Is it correct understood that it clears all the groups and refills them at every Logic app run?
No, it doesn’t clear the groups every run. The logic app checks every run if the user is in the right group, if not, remove from group 1 and add to ring 2 for instance
Great and very useful post! I would be really interested in doing the same approach for devices.
Hi Niklas,
You can use the same flow. You have to change only a few things, You have to add the following API permissions in the app registration:
Device.ReadWrite.All
Device.Read.All
and you have to change the URL of HTTP – Get all users action to
https://graph.microsoft.com/beta/devices?$select=idand the body of HTTP – Add selected users to group action to
{"@odata.id": "https://graph.microsoft.com/beta/devices/@{items('Apply_to_each_user_of_selected_users')['id']}"
}
Kind regards,
Rene