How to configure Microsoft Defender SmartScreen via Microsoft Intune?
The purpose of this blog post is to inform you how to configure Microsoft Defender SmartScreen in Windows, Edge, and Google Chrome via Microsoft Intune.
In this blog post, I will use the Endpoint Protection and Administrative Templates configuration profile to configure SmartScreen. Some of those Microsoft Defender SmartScreen settings are also part of the Microsoft Security baseline, but I like to have all the configuration of a feature in one profile instead of configuration in multiple profiles and configured in different places in the Intune portal.
Requirements:
What is Microsoft Defender SmartScreen, why should I configure it?
Microsoft Defender is a Windows built-in security solution that helps your user to be protected against phishing or malware websites and malicious applications and protects your user to download (potentially) malicious files.
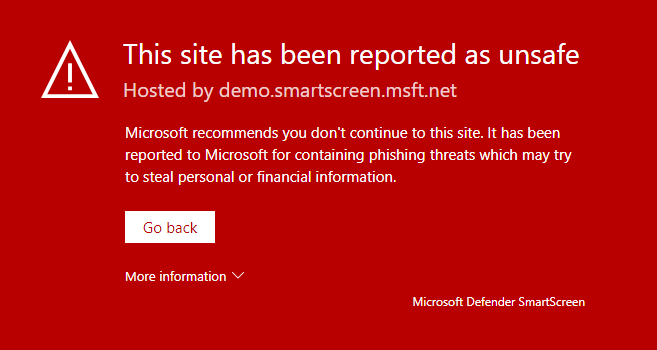
Microsoft Defender SmartScreen provides a warning page against e.g., websites that might engage in phishing attacks or attempt to distribute malware through a socially engineered attack.
When Microsoft Defender SmartScreen is configured, you will have the following benefits:
- Anti-phishing and anti-malware support
- Reputation-based URL and app protection
- Fully integrated into Windows 10 and 11
- Management via Microsoft Intune
- Microsoft Defender SmartScreen is constantly learning
- Blocking URLs associated with potentially unwanted applications
Microsoft Defender SmartScreen checks the reputation of any website, application, or web-based app the first time it’s run. Microsoft Defender SmartScreen will check the digital signatures and some other factors against a Microsoft-maintained service. If an app or website has no reputation or is known to be malicious, Microsoft Defender SmartScreen will warn the user or block the app from running entirely.
So, Microsoft Defender SmartScreen is a security layer that needs to be implemented in my opinion to protect your users against the dark part of the internet.
Which configuration profile setting should I configure?
In this blog post, I will configure SmartScreen via Microsoft Intune Administrative templates. So, I will configure only the required settings for Microsoft Intune on Windows 10/11.
Administrative template Microsoft Edge
Configure Microsoft Defender SmartScreen
This policy needs to be enabled so Microsoft Defender SmartScreen is turned on and the end-user cannot disable Microsoft Defender SmartScreen.
Configure Microsoft Defender SmartScreen to block potentially unwanted apps
This policy needs to be enabled to block potentially unwanted apps like adware, coin miners, bundleware, and other low-reputation apps that are hosted by websites
Enable Microsoft Defender SmartScreen DNS requests
This policy needs to be enabled. Microsoft Defender SmartScreen will made DNS requests to get the IP address and these IP addresses will be used for IP-based protection.
Enable new SmartScreen library
This policy needs to be enabled. Microsoft Edge will load the new SmartScreen library (libSmartScreenN) for all checks on site URLs or application downloads.
Force Microsoft Defender SmartScreen checks on downloads from trusted sources
This policy needs to be enabled. Microsoft Defender SmartScreen will also check the download reputation from files that are downloaded from a trusted source.
Prevent bypassing Microsoft Defender SmartScreen prompts for sites
This policy needs to be enabled. Users cannot bypass the Microsoft Defender SmartScreen warnings about potentially malicious websites.
Prevent bypassing of Microsoft Defender SmartScreen warnings about downloads
This policy needs to be enabled. Users cannot bypass the Microsoft Defender SmartScreen warnings about unverified downloads.
Administrative template Google Chrome
Configure the list of force-installed apps and extensions
This policy needs to be enabled. Microsoft Defender extension will be automatically installed and cannot be turned off.
Note: This policy doesn’t apply to Incognito mode.
Incognito mode availability
This policy needs to be enabled and set to disable incognito mode. So, SmartScreen is also enforced in Google Chrome because incognito is disabled.
Endpoint Protection Policy
SmartScreen for apps and files
This policy needs to be set to enable, SmartScreen will be enabled on Windows 10/11 and will check files on execution and running apps
Unverified files execution
This policy needs to be set to block, so it will block users from running unverified and malicious files.
How to configure Microsoft Defender SmartScreen
Microsoft Edge
- Open Microsoft endpoint manager
- In the menu select Devices
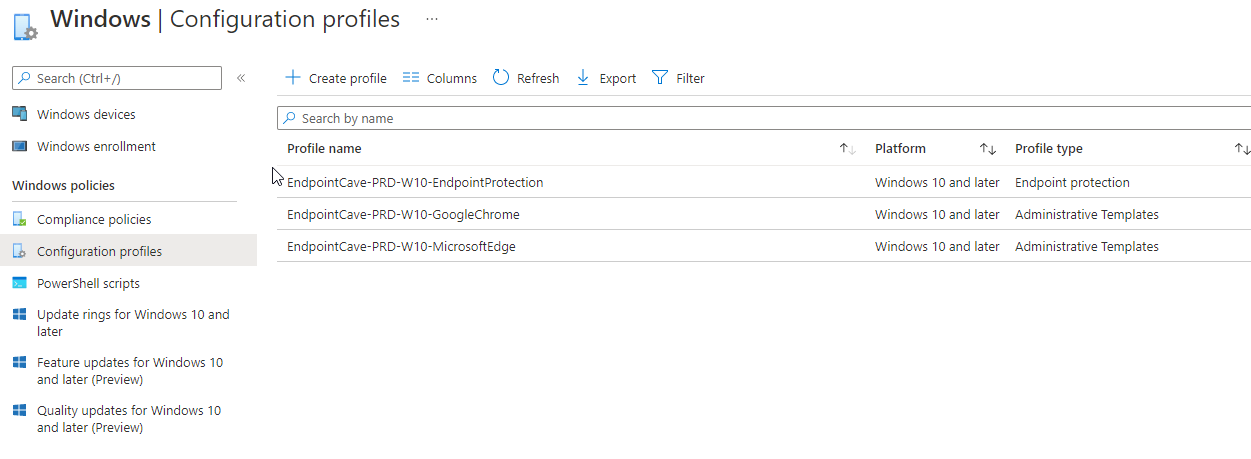
- Under Devices, select Windowsand select configuration profiles
Or use the following link Windows – Microsoft Endpoint Manager admin center - Click on + Create Profile
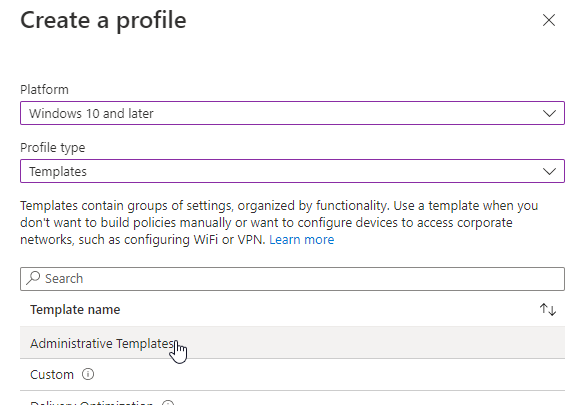
- Select Windows 10 and later as the platform
- Select Templates as the profile type and select Administrative Templates
- Click on Create
- Provide a policy name, e.g., EndpointCave-PRD-W10-MicrosoftEdge
- Set a description, so that everyone with access to the portal knows the purpose
- Click on Next and select the needed configuration settings.
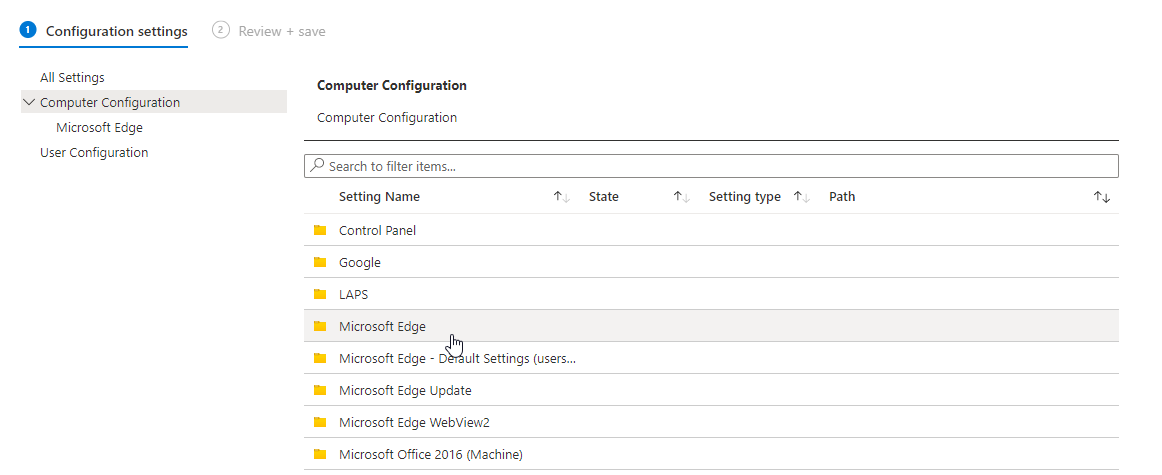
- Click on Microsoft Edge
- And now you click on SmartScreen settings
- Configure all required Configuration settings
| SmartScreen Setting name | Value |
|---|---|
| Configure Microsoft Defender SmartScreen | Enabled |
| Configure Microsoft Defender SmartScreen to block potentially unwanted apps | Enabled |
| Enable Microsoft Defender SmartScreen DNS requests | Enabled |
| Enable new SmartScreen library | Enabled |
| Force Microsoft Defender SmartScreen checks on downloads from trusted sources | Enabled |
| Prevent bypassing Microsoft Defender SmartScreen prompts for sites | Enabled |
| Prevent bypassing of Microsoft Defender SmartScreen warnings about downloads | Enabled |
- Click on Next
- Enter a scope tag if needed and click on Next
- Assign the profile to a group and click on Next
- Check the configuration at the Review + Create page and click on Create
Google Chrome
- Open Microsoft endpoint manager
- In the menu select Devices
- Under Devices, select Windows and select configuration profiles
Or use the following link Windows – Microsoft Endpoint Manager admin center - Click on + Create Profile
- Select Windows 10 and later as the platform
- Select Templates as the profile type and select Administrative Templates
- Click on Create
- Provide a policy name, e.g., EndpointCave-PRD-W10-GoogleChrome
- Set a description, so that everyone with access to the portal knows the purpose
- Click on Next and select the needed configuration settings.
- Click on Google
- And now you click on Google Chrome
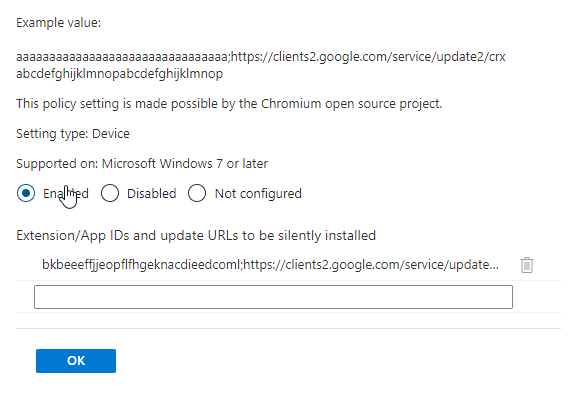
- Enable the setting Configure the list of force-installed apps and extensions
- Set the Extension/App ID, So Microsoft Defender SmartScreen will be silently installed.
bkbeeeffjjeopflfhgeknacdieedcoml;https://clients2.google.com/service/update2/crxNote. Link to extension: https://chrome.google.com/webstore/detail/microsoft-defender-browse/bkbeeeffjjeopflfhgeknacdieedcoml
- Go back to Google Chrome and search for Incognito mode availability
- Enable Incognito mode availability and set the incognito mode availability to Incognito mode disabled
- Click on Ok
- Now it is time to save the configuration and click on Next
- Enter a scope tag if needed and click on Next
- Assign the profile to a group and click on Next
- Check the configuration at the Review + Create page and click on Create
Endpoint protection
- Open Microsoft endpoint manager
- In the menu select Devices
- Under Devices, select Windows and select configuration profiles
Or use the following link Windows – Microsoft Endpoint Manager admin center - Click on + Create Profile
- Select Windows 10 and later as the platform
- Select Templates as the profile type and select Endpoint Protection
- Click on Create
- Provide a policy name, e.g., EndpointCave-PRD-W10-EndpointProtection
- Set a description, so that everyone with access to the portal knows the purpose
- Click on Next click on Microsoft Defender SmartScreen
- Configure all required Configuration settings
| SmartScreen Setting name | Value |
|---|---|
| SmartScreen for apps and files | Enabled |
| Unverified files execution | Enabled |
- Click on Next
- Enter a scope tag if needed and click on Next
- Assign the profile to a group and click on Next
- At the applicability rules page, configure some rules or click on next
- Check the configuration at the Review + Create page and click on Create
Test your Microsoft Defender SmartScreen configuration
If you want to check if your configuration is successfully applied to your device. You can check the policy page in Microsoft Edge or Google Chrome via the following URL:
| Edge: | Edge://policy |
| Chrome: | Chrome://policy |
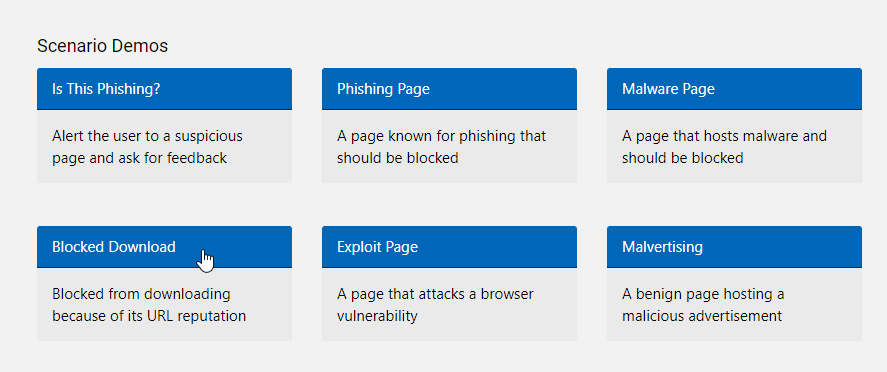
To validate if SmartScreen is working correctly, you can use Defender testground until the 15th of June via UrlRep – Microsoft Defender Testground and select one of the demos scenarios




 Hi! My name is René Laas. I have passion and enthusiasm for the Microsoft 365 Cloud. I am based in the Netherlands.

Leave a Reply
Want to join the discussion?Feel free to contribute!