Get notified when new Windows Feature updates are available
The purpose of this blog post is to inform you how to get notified via Adaptive Cards in Microsoft Teams when a new Windows Feature update is released.
To take advantage of the new functionalities of Windows, you must update to a new version of Windows. I have noticed that the Windows Feature versions list in Intune is not always updated immediately after the update becomes available. Nor do you receive a notification. So, I decided to create the notification via a Logic app. Also, I can use the notification to start my test execution to test my configuration and applications on the new feature version of Windows.
Requirements:
Graph API Permissions:
Feature updates for Windows 10 and later policy in Intune
With Feature updates for Windows 10 and later in Intune, you can select the Windows feature update version that you want devices to remain at, like Windows 10 version 1909 or a version of Windows 11. Intune supports setting a feature level to any version that remains in support at the time you create the policy.
Windows feature updates policies work with your Update rings for Windows 10 and later policies to prevent a device from receiving a Windows feature version that’s later than the value specified in the feature updates policy.
What is an Azure Logic App
Azure Logic Apps is a cloud service that helps you schedule, automate, and orchestrate tasks, business processes, and workflows when you need to integrate apps, data, systems, and services across enterprises or organizations.
More information about Azure Logic Apps can be found here
What are adaptive cards?
Adaptive Cards are platform-agnostic snippets of UI, authored in JSON, that apps and services can openly exchange. When delivered to a specific app, the JSON is transformed into a native UI that automatically adapts to its surroundings. It helps design and integrate lightweight UI for all major platforms and frameworks.
More information about Adaptive cards can be found here
Create an App Registration in Azure AD
- Open azure.com
- Click on Azure Active Directory
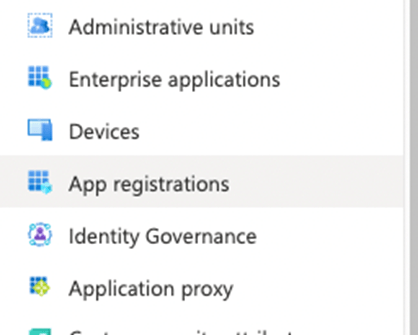
- Click on App Registration in the left menu
Or use the following link Active Directory | App Registration
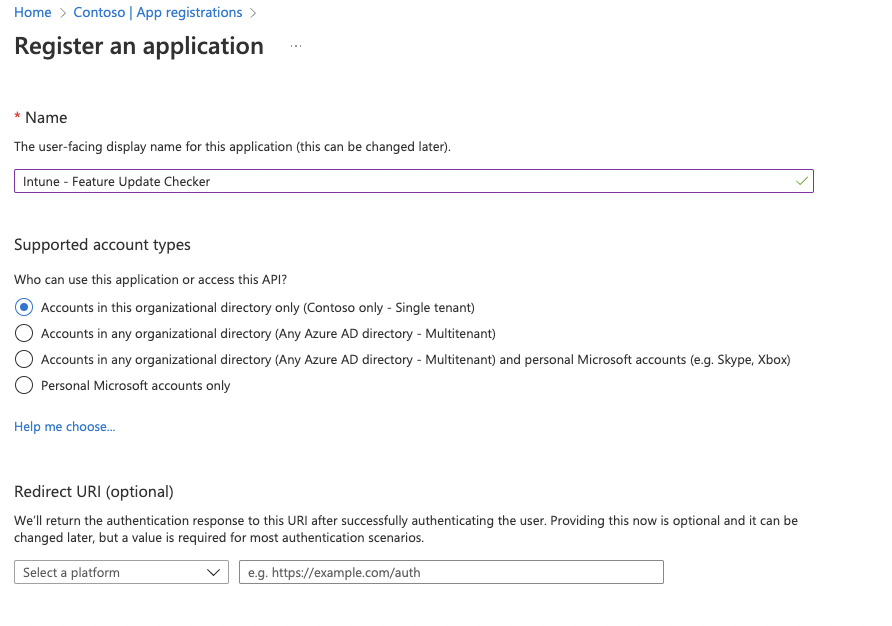
- Click on + New registration
- Configure an app name e.g., Intune – Feature Update Checker
- Click on the Register button, the app will be created and automatically opened.
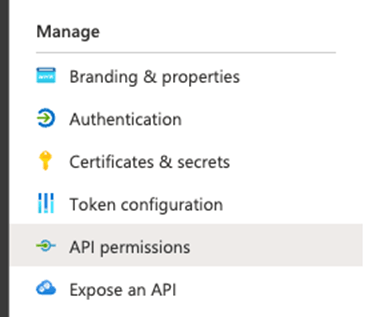
- In the menu click on API Permissions
- Click on+ Add a permission
- Select Microsoft Graph and select Application permissions
- Search and add the following permissions
DeviceManagementConfiguration.Read.All
DeviceManagementConfiguration.ReadWrite.All- Grant admin consent for your organisation
- In the menu click on Certificates & Secrets
- Click on + New Client secret
- Set a description and the expiry of the secret and click on Add
- Copy the value of the secret, the secret is needed for the flow.
- Go to the overview page and copy the Client ID and Tenant ID, those are also needed in the flow.
Create a Teams Channel Webhook
- Open Microsoft Teams
- Click on Teams in the menu and select the correct team
- Click on the 3 bullets behind a Teams channel
- In the menu click on Connectors
- The connectors screen will pop up and search for “Incoming Webhook” and select Configure
- The connector will be added to the channel, but first, we must provide a name.
Note. This name will be displayed for every notification.
- Upload another logo if needed.
- Click on create
- A Webhook URL will automatically be created, copy this URL because it is needed in the flow.
- Click on Done
Create an Azure Logic App for the Windows Feature updates notifications
Note. Rename every Azure Logic App action to match the screenshots!
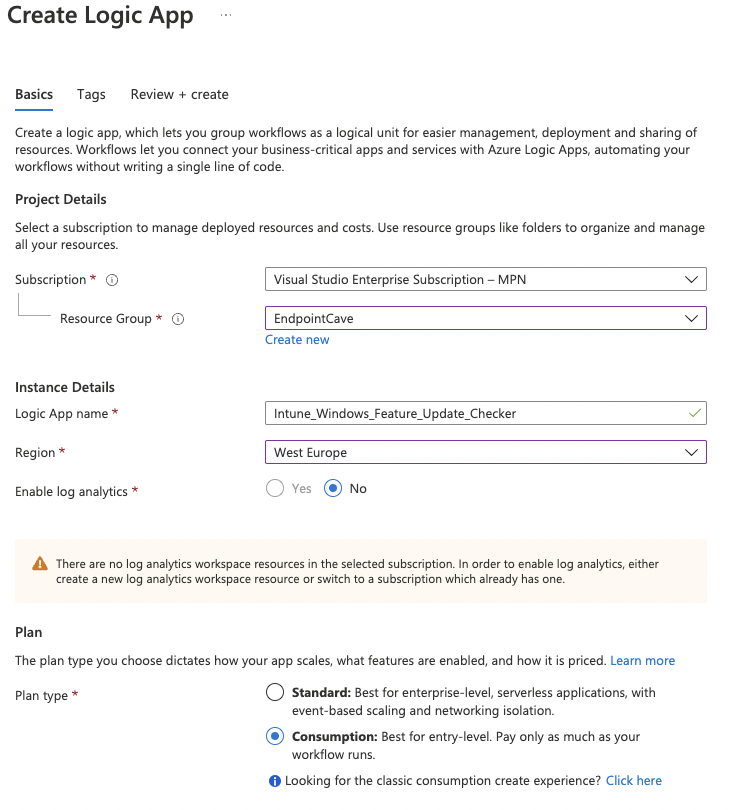
- Open portal.azure.com
- Search for Logic App
- Click on + Add
- Select an existing Resource Group or create a new Resource Group
- Select the instance Type (I have chosen for Consumption, but check the Azure Calculator which option fits your environment)
- Select your region and click on Review + Create
- Check the details on the Review + Create page and click on Create
- After the deployment is completed, go to your new Logic App via Go to Resource button
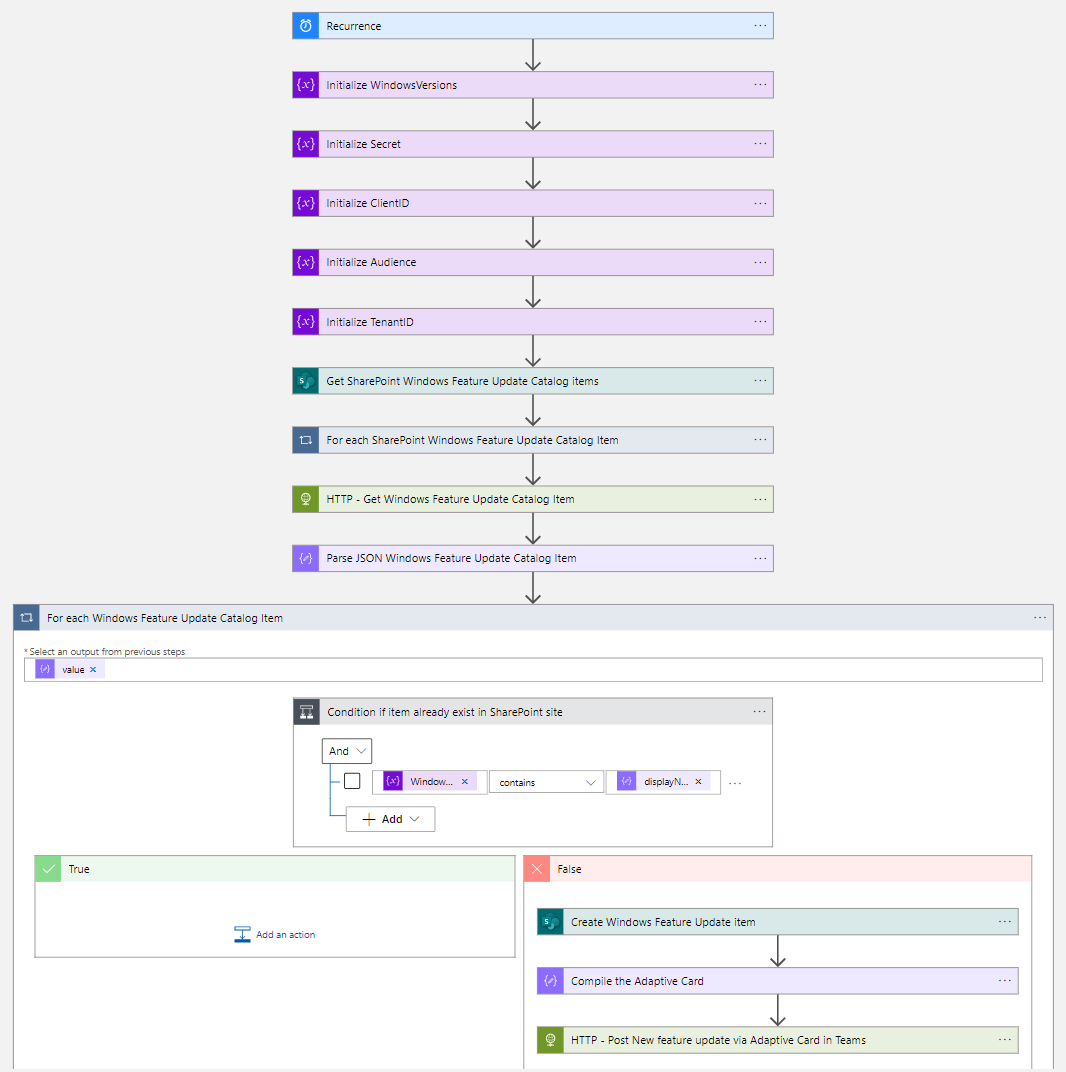
- The first step of the workflow is the Recurrence trigger, based on the desired interval
Note. I have used a 1 day interval in this blog.
- The next five steps of the workflow are to initialize variables.
| Initialize Audience Variable | Initialize TenantID Variable | Initialize ClientID Variable | Initialize Secret Variable | Initialize WindowsVersions | |
|---|---|---|---|---|---|
| Name | Audience | ClientID | TenantID | Secret | WindowsVersions |
| Type | String | String | String | String | Array |
| Value | https://graph.microsoft.com | {Paste your Tenant ID} | {Paste your Client ID} | {Paste your Secret} |
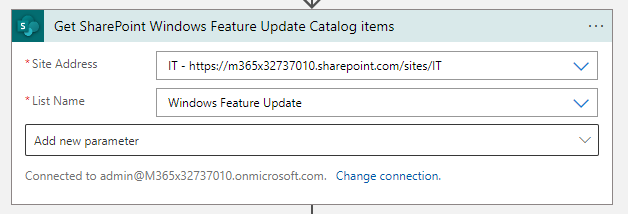
- The next step is to get items from the SharePoint list.
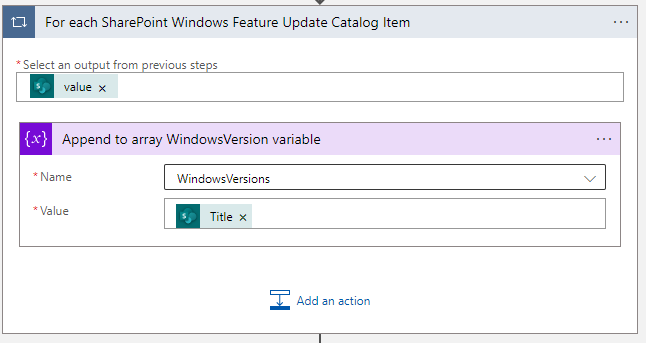
- After the Get SharePoint Windows Feature Update Catalog items step, you have to create a for each loop.
- Within the For each SharePoint Windows Feature Update Catalog Item loop, create an Append to array action
- Select the variable WindowsVersions as the name and select Title of the Get SharePoint Windows Feature Update Catalog items step as the Value
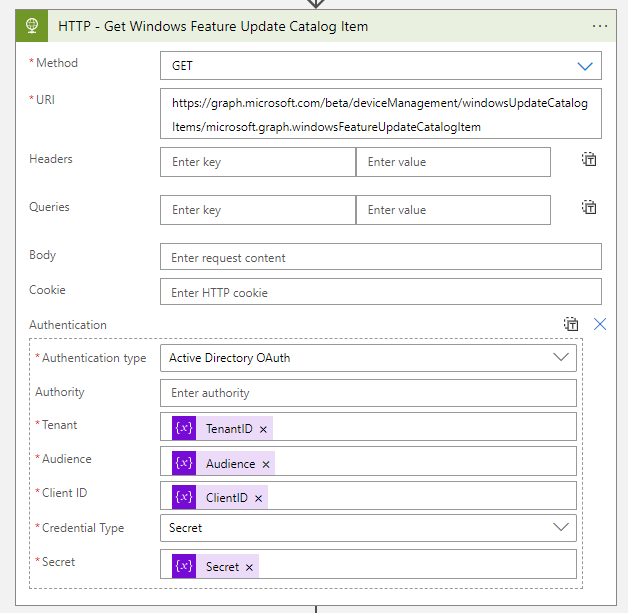
- The next step is to get the available Windows Feature update version from Intune via a HTTP action, set the below HTTP configuration
URI:
https://graph.microsoft.com/beta/deviceManagement/windowsUpdateCatalogItems/microsoft.graph.windowsFeatureUpdateCatalogItem| Method | GET |
| Authentication Type | Active Directory OAuth |
| Tenant | @{variables(‘TenantID’)} |
| Audience | @{variables(‘Audience’)} |
| Client ID | @{variables(‘ClientID’)} |
| Credential Type | Secret |
| Secret | @{variables(‘Secret’)} |
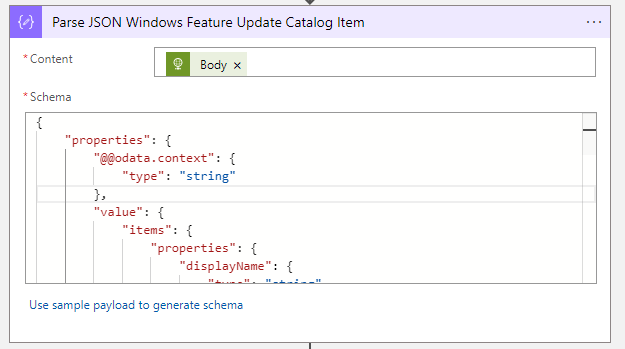
- After the HTTP – Get Windows Feature Update Catalog Item action you need to parse the body of the HTTP Graph API response, create a Parse JSON action
- Use the following schema in the Parse JSON Windows Feature Update Catalog Item action
{
    "properties": {
        "@@odata.context": {
            "type": "string"
        },
        "value": {
            "items": {
                "properties": {
                    "displayName": {
                        "type": "string"
                    },
                    "endOfSupportDate": {
                        "type": "string"
                    },
                    "id": {
                        "type": "string"
                    },
                    "releaseDateTime": {
                        "type": "string"
                    },
                    "version": {
                        "type": "string"
                    }
                },
                "required": [
                    "id",
                    "displayName",
                    "releaseDateTime",
                    "endOfSupportDate",
                    "version"
                ],
                "type": "object"
            },
            "type": "array"
        }
    },
    "type": "object"
}- After the Parse JSON Windows Feature Update Catalog Item step, you have to create another for each loop.
- Within the For each Windows Feature Update Catalog Item loop, create a Condition
- Set the following condition for the Condition if item already exist in SharePoint site action
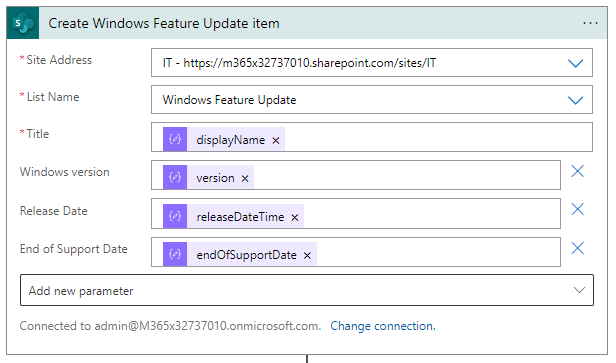
@variables('WindowsVersions') contains @items('For_each_Windows_Feature_Update_Catalog_Item')?['displayName']- Add a Create item action to the False section of the condition and set the following configuration in the Create Windows Feature Update item action.
| Method | POST |
| URI | {Webhook URL} |
| Authentication Type | Active Directory OAuth |
| Tenant | @{variables(‘TenantID’)} |
| Audience | @{variables(‘Audience’)} |
| Client ID | @{variables(‘ClientID’)} |
| Credential Type | Secret |
| Secret | @{variables(‘Secret’)} |
- Now the new Windows Feature update have been added to the SharePoint list, you need to create a Compose action to Compile the Adaptive card
{
  "$schema": "http://adaptivecards.io/schemas/adaptive-card.json",
  "body": [
    {
      "columns": [
        {
          "items": [
            {
              "text": "New Windows feature update available",
              "type": "TextBlock",
              "weight": "bolder",
              "wrap": true
            }
          ],
          "type": "Column",
          "width": "stretch"
        }
      ],
      "type": "ColumnSet"
    },
    {
      "facts": [
        {
          "title": "Name:",
          "value": "@{first(split(items('For_each_Windows_Feature_Update_Catalog_Item')?['displayName'],','))}"
        },
        {
          "title": "Version:",
          "value": "@{last(split(last(split(items('For_each_Windows_Feature_Update_Catalog_Item')?['version'],',')),' '))}"
        },
        {
          "title": "Release date:",
          "value": "@{formatDateTime(items('For_each_Windows_Feature_Update_Catalog_Item')?['releaseDateTime'], 'yyyy-MM-dd')}"
        },
        {
          "title": "End of Support Date:",
          "value": "@{formatDateTime(items('For_each_Windows_Feature_Update_Catalog_Item')?['endOfSupportDate'], 'yyyy-MM-dd')}"
        }
      ],
      "type": "FactSet"
    }
  ],
  "msteams": {
    "width": "Full"
  },
  "type": "AdaptiveCard",
  "version": "1.5"
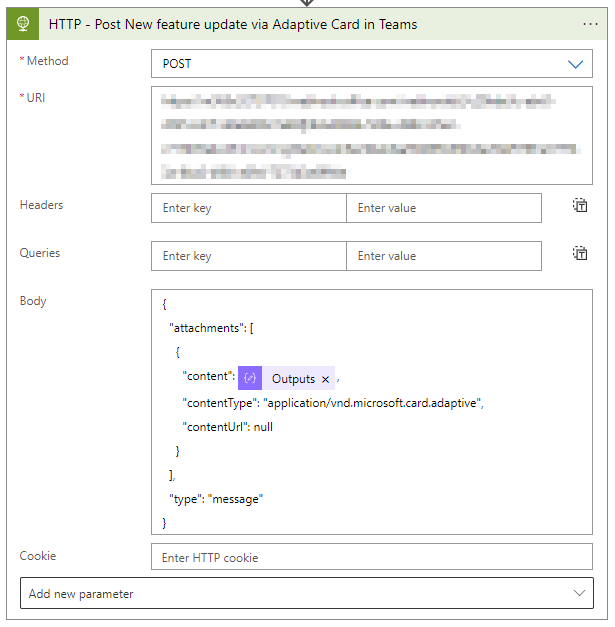
}- The latest step is to post the Adaptive Card with the needed information in Microsoft Teams
- Add a HTTP action set the following configuration
| Method | POST |
| URI | {Webhook URL} |
| Authentication Type | Active Directory OAuth |
| Tenant | @{variables(‘TenantID’)} |
| Audience | @{variables(‘Audience’)} |
| Client ID | @{variables(‘ClientID’)} |
| Credential Type | Secret |
| Secret | @{variables(‘Secret’)} |
- Use the below code for the body of the HTTP – Post New feature update via Adaptive Card in Teams action
{
  "attachments": [
    {
      "content": @{outputs('Compile_the_Adaptive_Card')},
      "contentType": "application/vnd.microsoft.card.adaptive",
      "contentUrl": null
    }
  ],
  "type": "message"
}







 Hi! My name is René Laas. I have passion and enthusiasm for the Microsoft 365 Cloud. I am based in the Netherlands.
 Matthew Jungling
 Amador Loureiro
Leave a Reply
Want to join the discussion?Feel free to contribute!